Microsoft Entra ID Integration
Looking for WPA-Enterprise RADIUS authentication with Microsoft Entra ID? See Microsoft Entra ID Connector.
Connect IronWiFi to Microsoft Entra ID (formerly Azure Active Directory) to authenticate WiFi users with their corporate credentials, sync users and groups, and apply Conditional Access policies to your wireless network.
Features
- SAML Authentication - Enterprise SSO for captive portals
- OAuth Authentication - Simpler social login for captive portals
- User Synchronization - Import users from Entra ID for RADIUS
- Group Synchronization - Sync security groups
- PEAP-MSCHAPv2 - WPA-Enterprise with Azure credentials
- Conditional Access - Enforce MFA and compliance policies
Prerequisites
- Microsoft Entra ID administrator account
- IronWiFi account with Connector access
- Azure subscription (free tier works)
SAML Single Sign-On
Use SAML for captive portal authentication, allowing users to sign in with their Microsoft Entra ID credentials.
Step 1: Create Azure Enterprise Application
- Log into Azure Portal
- Navigate to Microsoft Entra ID > Enterprise applications
- Click New application
- Select Create your own application
- Name: "IronWiFi Captive Portal"
- Select Integrate any other application you don't find in the gallery (Non-gallery)
- Click Create

Step 2: Configure User Assignment
- In the application, go to Properties
- Set User assignment required? to No
- Click Save
This allows all users in your directory to authenticate without manual assignment.


Step 3: Configure SAML
- Click Single sign-on in the left menu
- Select SAML

- Click Edit on Basic SAML Configuration
- Enter these values (get exact URLs from IronWiFi Console > Captive Portals > Authentication Providers):
| Field | Example Value |
|---|---|
| Identifier (Entity ID) | |
| Reply URL (ACS URL) | |
| Sign on URL | Your splash page URL |
Region-specific URLs:
- US West:
us-west1.ironwifi.com - Europe West:
europe-west2.ironwifi.com - Global/Default:
splash.ironwifi.com
- Click Save
Step 4: Configure User Identifier (Critical)
- Click Edit on Attributes & Claims
- Click on the Unique User Identifier (Name ID) claim
- Change Source attribute to user.mail
- Click Save
This ensures Azure sends the user's email address as the identifier, which IronWiFi requires.
Step 5: Configure Additional Claims
Add or verify these attribute claims:
| Claim Name | Source Attribute |
|---|---|
| emailaddress | user.mail |
| givenname | user.givenname |
| surname | user.surname |
Step 6: Download SAML Configuration
From the SAML Signing Certificate section, collect these three values:
- Login URL - Copy the URL (e.g., )
https://login.microsoftonline.com/.../saml2 - Microsoft Entra Identifier - Copy the Entity ID
- Certificate (Base64) - Click Download and copy the certificate content
")
Step 7: Configure IronWiFi
- Log into IronWiFi Console
- Navigate to Networks > Captive Portals
- Select your captive portal or create a new one
- Expand Authentication Providers
- Click Add Provider > SAML2 Single Sign-on
- Enter the values from Azure:
| IronWiFi Field | Azure Value |
|---|---|
| SSO URL | Login URL |
| IDP Entity ID | Microsoft Entra Identifier |
| Certificate | Certificate (Base64) content |
| NameID Format | |
- Click Save

Step 8: Configure Walled Garden
Add these domains to your access point's walled garden:
Step 9: Test Authentication
- Connect to your WiFi network
- The captive portal should redirect to Microsoft login
- Sign in with Entra ID credentials
- Verify successful authentication and internet access
OAuth Authentication (Captive Portal)
Use OAuth for simpler captive portal authentication without SAML complexity.
Step 1: Register Azure Application
- Log into Azure Portal
- Navigate to Microsoft Entra ID > App registrations


- Click New registration
- Configure:
- Name: IronWiFi OAuth
- Supported account types: Accounts in this organizational directory only
- Redirect URI: Select Web and enter your region URL:
- US West:
https://us-west1.ironwifi.com/api/signin/azure - Europe West:
https://europe-west2.ironwifi.com/api/signin/azure - Global:
https://splash.ironwifi.com/api/signin/azure
- US West:
- Click Register

Step 2: Copy Application ID
After registration, copy the Application (client) ID from the Overview page.
 ID from the app Overview page")
Step 3: Create Client Secret
- Go to Certificates & secrets
- Click New client secret
- Set description: "IronWiFi OAuth"
- Set expiration (recommended: 24 months)
- Click Add
- Immediately copy the secret value (it won't be shown again)

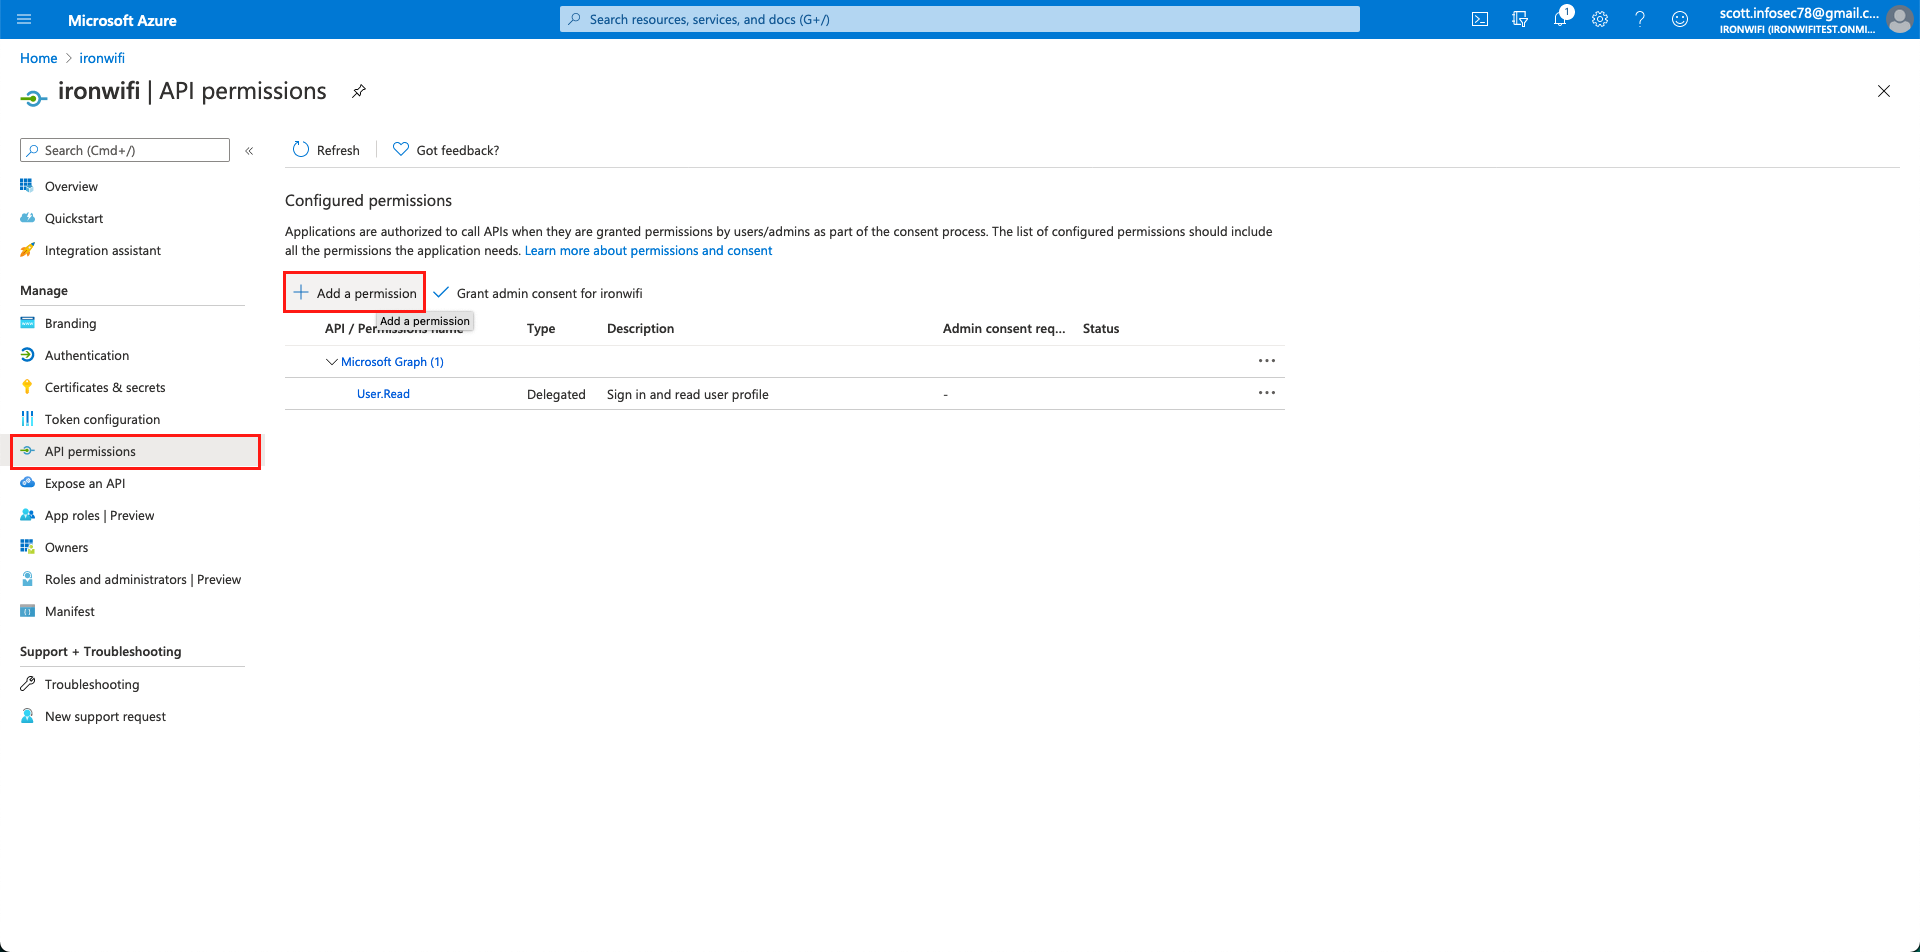
Step 4: Configure API Permissions
- Go to API permissions
- Click Add a permission > Microsoft Graph > Delegated permissions
- Add these permissions:
openidprofileemailUser.Read
- Click Add permissions
- Click Grant admin consent (if you have admin rights)
Step 5: Configure IronWiFi
- Log into IronWiFi Console
- Navigate to Networks > Captive Portals
- Select your captive portal

- Expand Authentication Providers
- Click Add New

- Click Add Provider > Social Login - OAuth 2.0
- Select Azure as the provider
- Enter:
- Client ID: Application (client) ID from Azure
- Client Secret: Secret value from Step 3
- Click Create

Step 6: Configure Walled Garden
Add the same domains as SAML to your walled garden:
Step 7: Test OAuth Login
- Connect to your WiFi network
- Click the Microsoft/Azure login button on the captive portal
- Sign in with Entra ID credentials
- Verify successful authentication
User Synchronization (Connector)
Import users from Microsoft Entra ID for RADIUS authentication (WPA-Enterprise).
Step 1: Get Tenant ID
- Log into Azure Portal
- Navigate to Microsoft Entra ID > Overview (or Properties)
- Copy the Tenant ID

Step 2: Register Application
- Go to Microsoft Entra ID > App registrations
- Click New registration
- Configure:
- Name: IronWiFi RADIUS Connector
- Supported account types: Accounts in this organizational directory only
- Redirect URI: Select Web and enter:
https://console.ironwifi.com/api/oauth2callback- (For EU region: )
https://console-eu.ironwifi.com/api/oauth2callback
- Click Register
- Copy the Application (client) ID

Step 3: Configure API Permissions
- Go to API permissions
- Click Add a permission > Microsoft Graph > Application permissions
- Search for and select Directory.Read.All
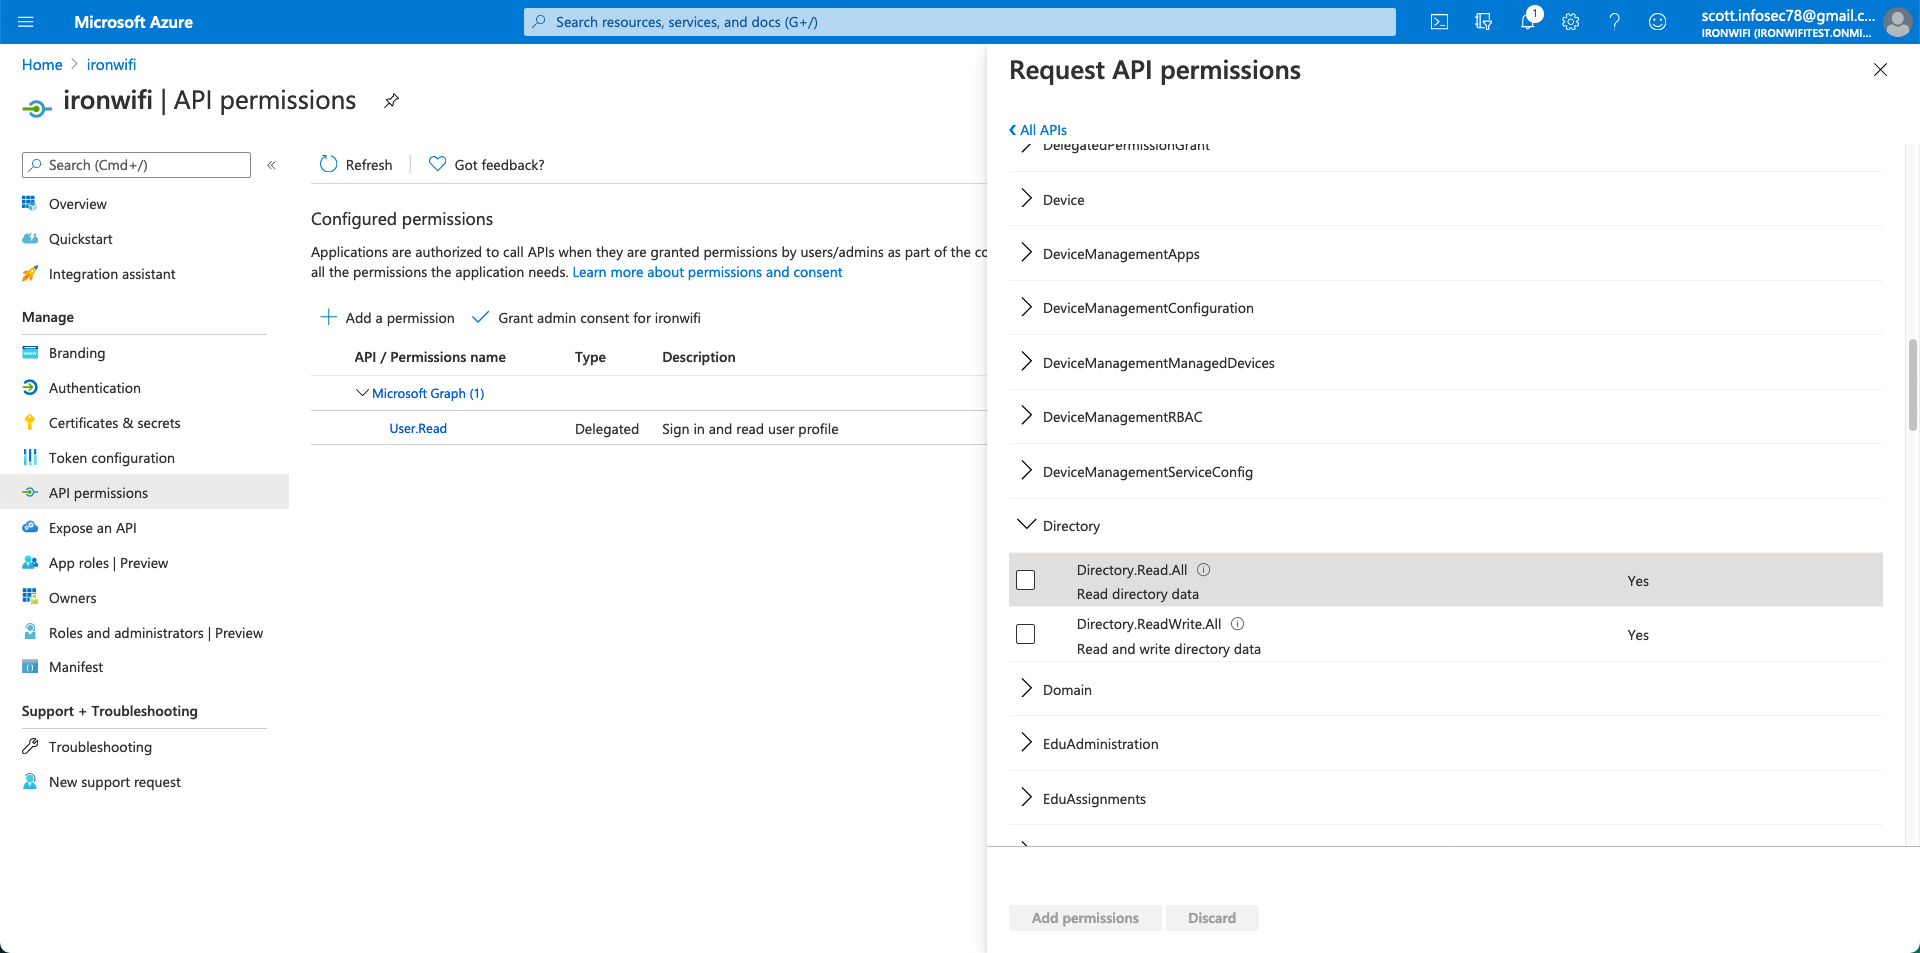
- Click Add permissions
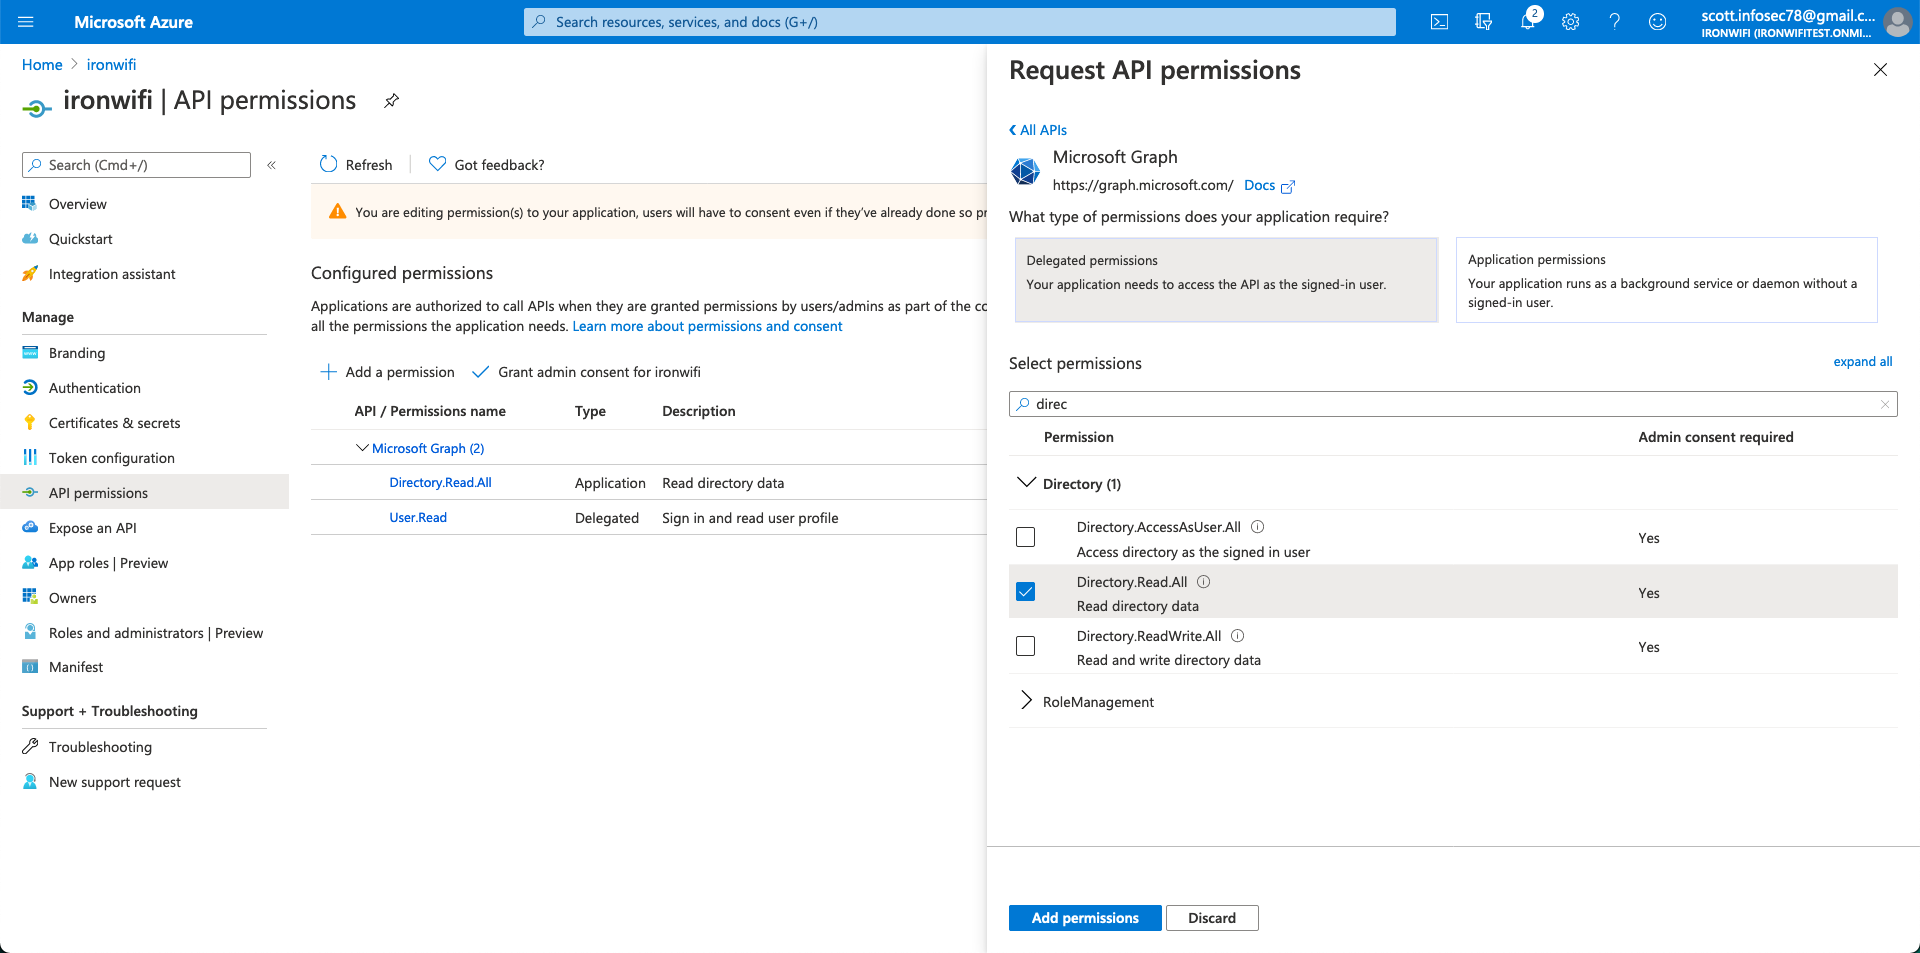
- Click Grant admin consent for [your organization]
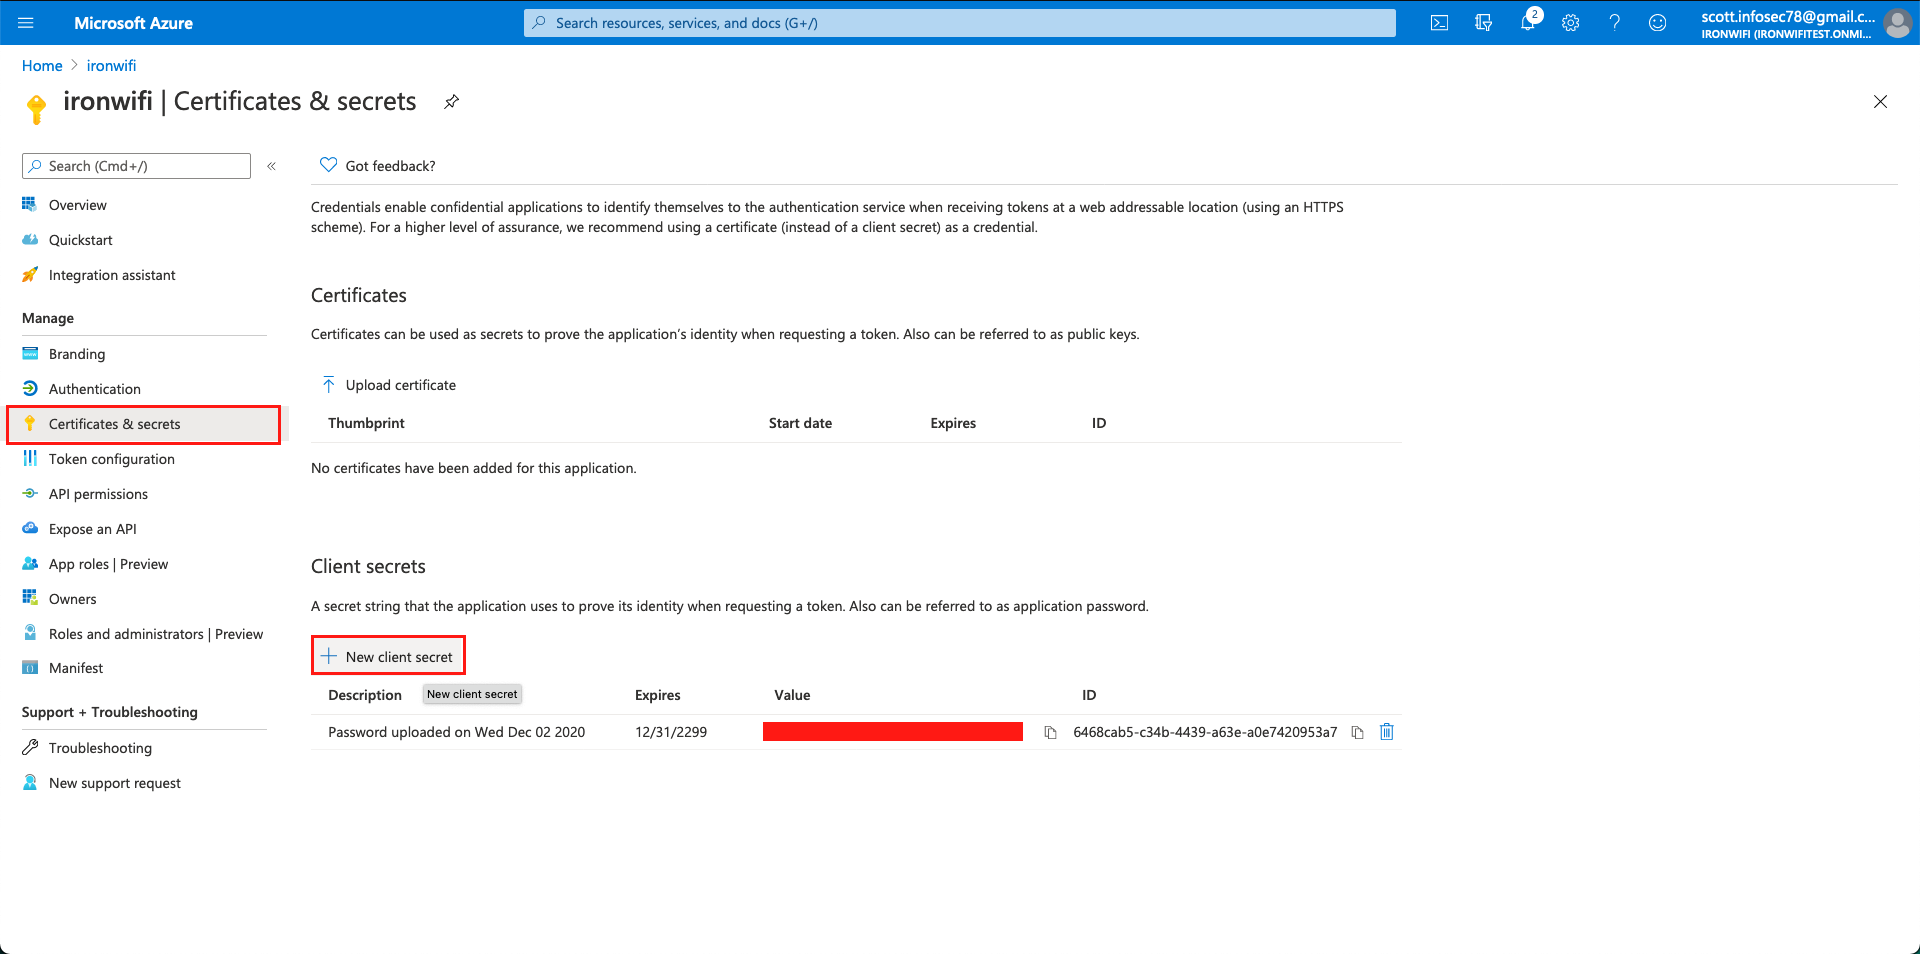
Step 4: Create Client Secret
- Go to Certificates & secrets
- Click New client secret
- Set description and expiration (recommended: 24 months or longer)
- Click Add
- Immediately copy the secret value
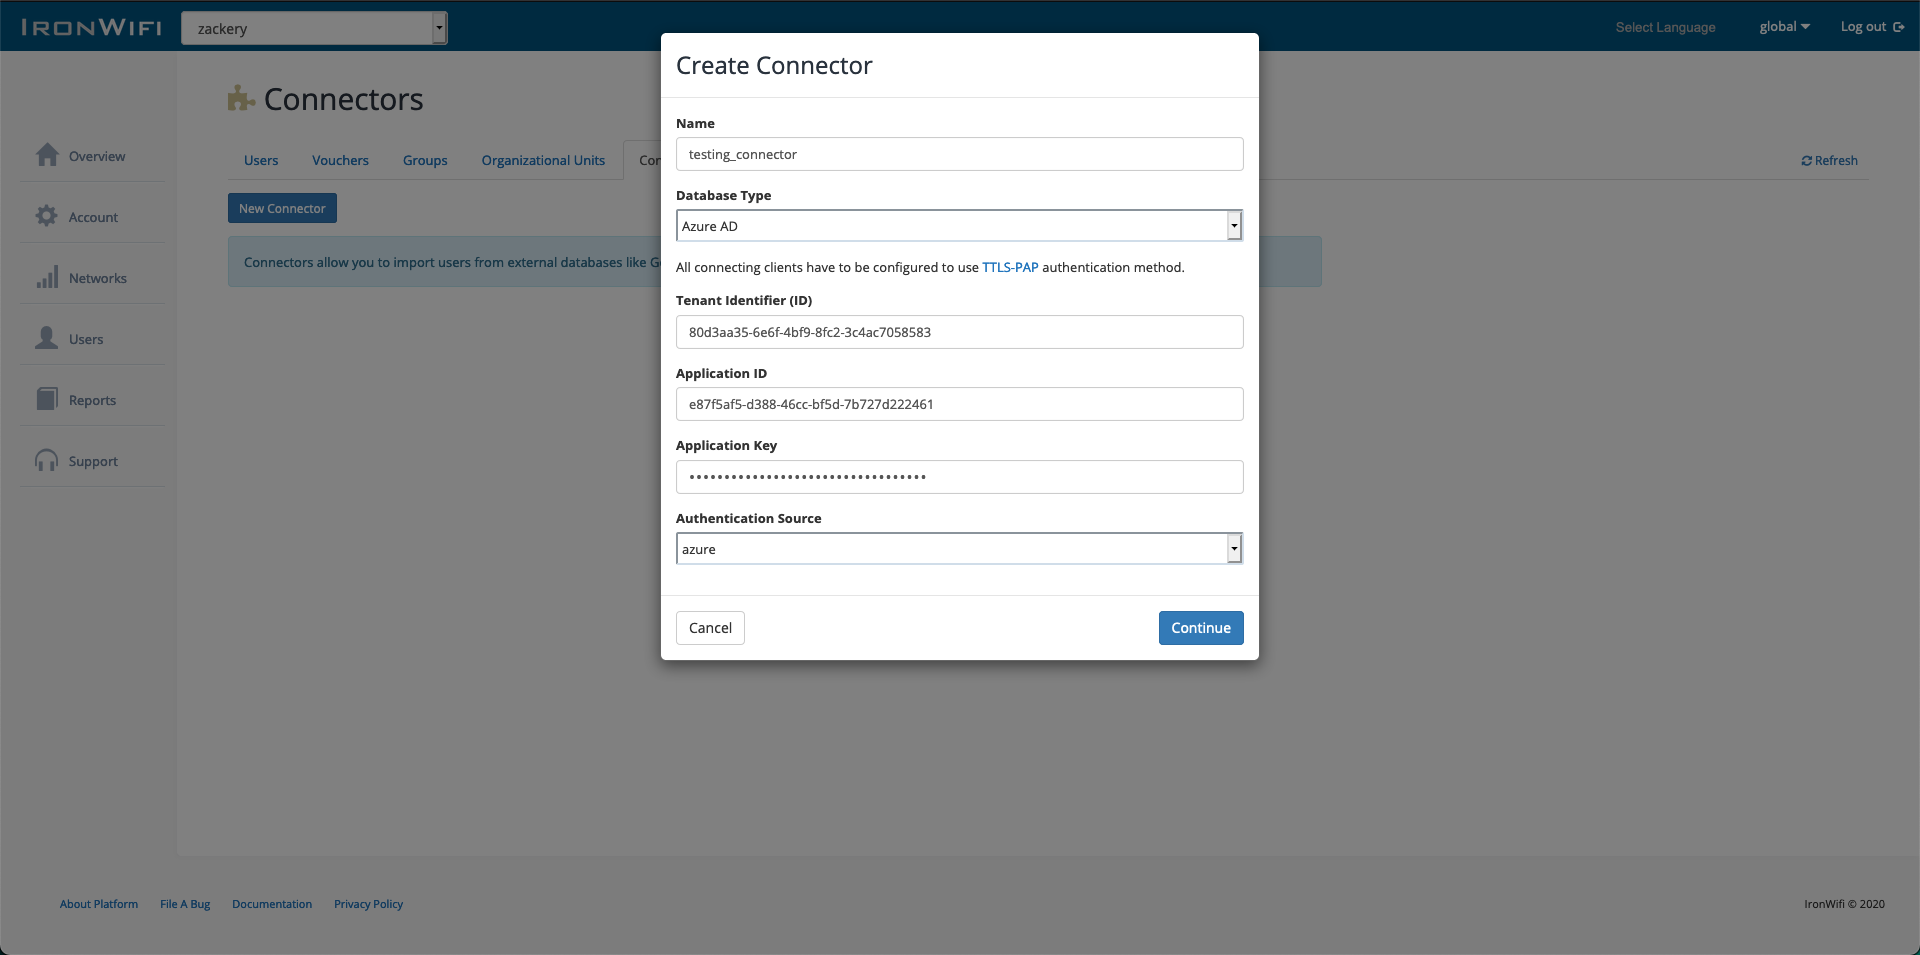
Step 5: Configure IronWiFi Connector
- Log into IronWiFi Console
- Navigate to Users > Connectors
- Click New Connector
- Select Microsoft Entra ID (Azure AD)
- Enter:
- Name: Microsoft Entra ID (or your preferred name)
- Tenant ID: From Step 1
- Application ID: From Step 2
- Client Secret: From Step 4
Step 6: Authorize Connection
- Click Authorize or Connect
- You'll be redirected to Microsoft login
- Sign in with an admin account
- Grant the requested permissions
- You'll be redirected back to IronWiFi
Step 7: Select Groups to Sync
- After authorization, select which groups to import
- Choose sync options:
- All users or specific groups
- Include disabled accounts (optional)
- Sync frequency
- Click Save
Authentication Methods
After syncing users, configure how they authenticate:
| Method | Description | Requirements |
|---|---|---|
| Generated Passwords | IronWiFi generates unique passwords | PEAP-MSCHAPv2 |
| Client Certificates | Certificate-based auth | EAP-TLS, requires SCEP/Intune |
| Azure Credentials (TTLS-PAP) | Users use their Entra ID password | TTLS-PAP, IronWiFi AD Bridge |
| PEAP-MSCHAPv2 with AD Bridge | Native Azure password auth | IronWiFi AD Bridge agent |
AD Bridge is an IronWiFi agent for real-time password verification against Entra ID. Contact IronWiFi support for setup.
Sync Settings
Configure what to synchronize:
- All users or filtered by group
- Include/exclude disabled accounts
- Group membership mapping
- Custom attribute mapping
WPA-Enterprise with Azure AD
PEAP-MSCHAPv2
For WPA-Enterprise authentication using Azure credentials:
This requires Microsoft Entra ID P1/P2 or Microsoft 365 licensing that includes Microsoft Entra ID Premium features.
- Enable Password Hash Synchronization in Microsoft Entra Connect
- Configure IronWiFi connector for RADIUS authentication
- Set user authentication source to Microsoft Entra ID
Certificate-Based (EAP-TLS)
For certificate authentication:
- Deploy certificates via Intune or MDM
- Configure IronWiFi for EAP-TLS
- Map certificate attributes to users
Conditional Access and MFA
Integrate with Microsoft Entra Conditional Access to require MFA or enforce other policies.
Prerequisites
- Complete SAML or OAuth setup first (see sections above)
- Microsoft Entra ID P1 or P2 license (for Conditional Access)
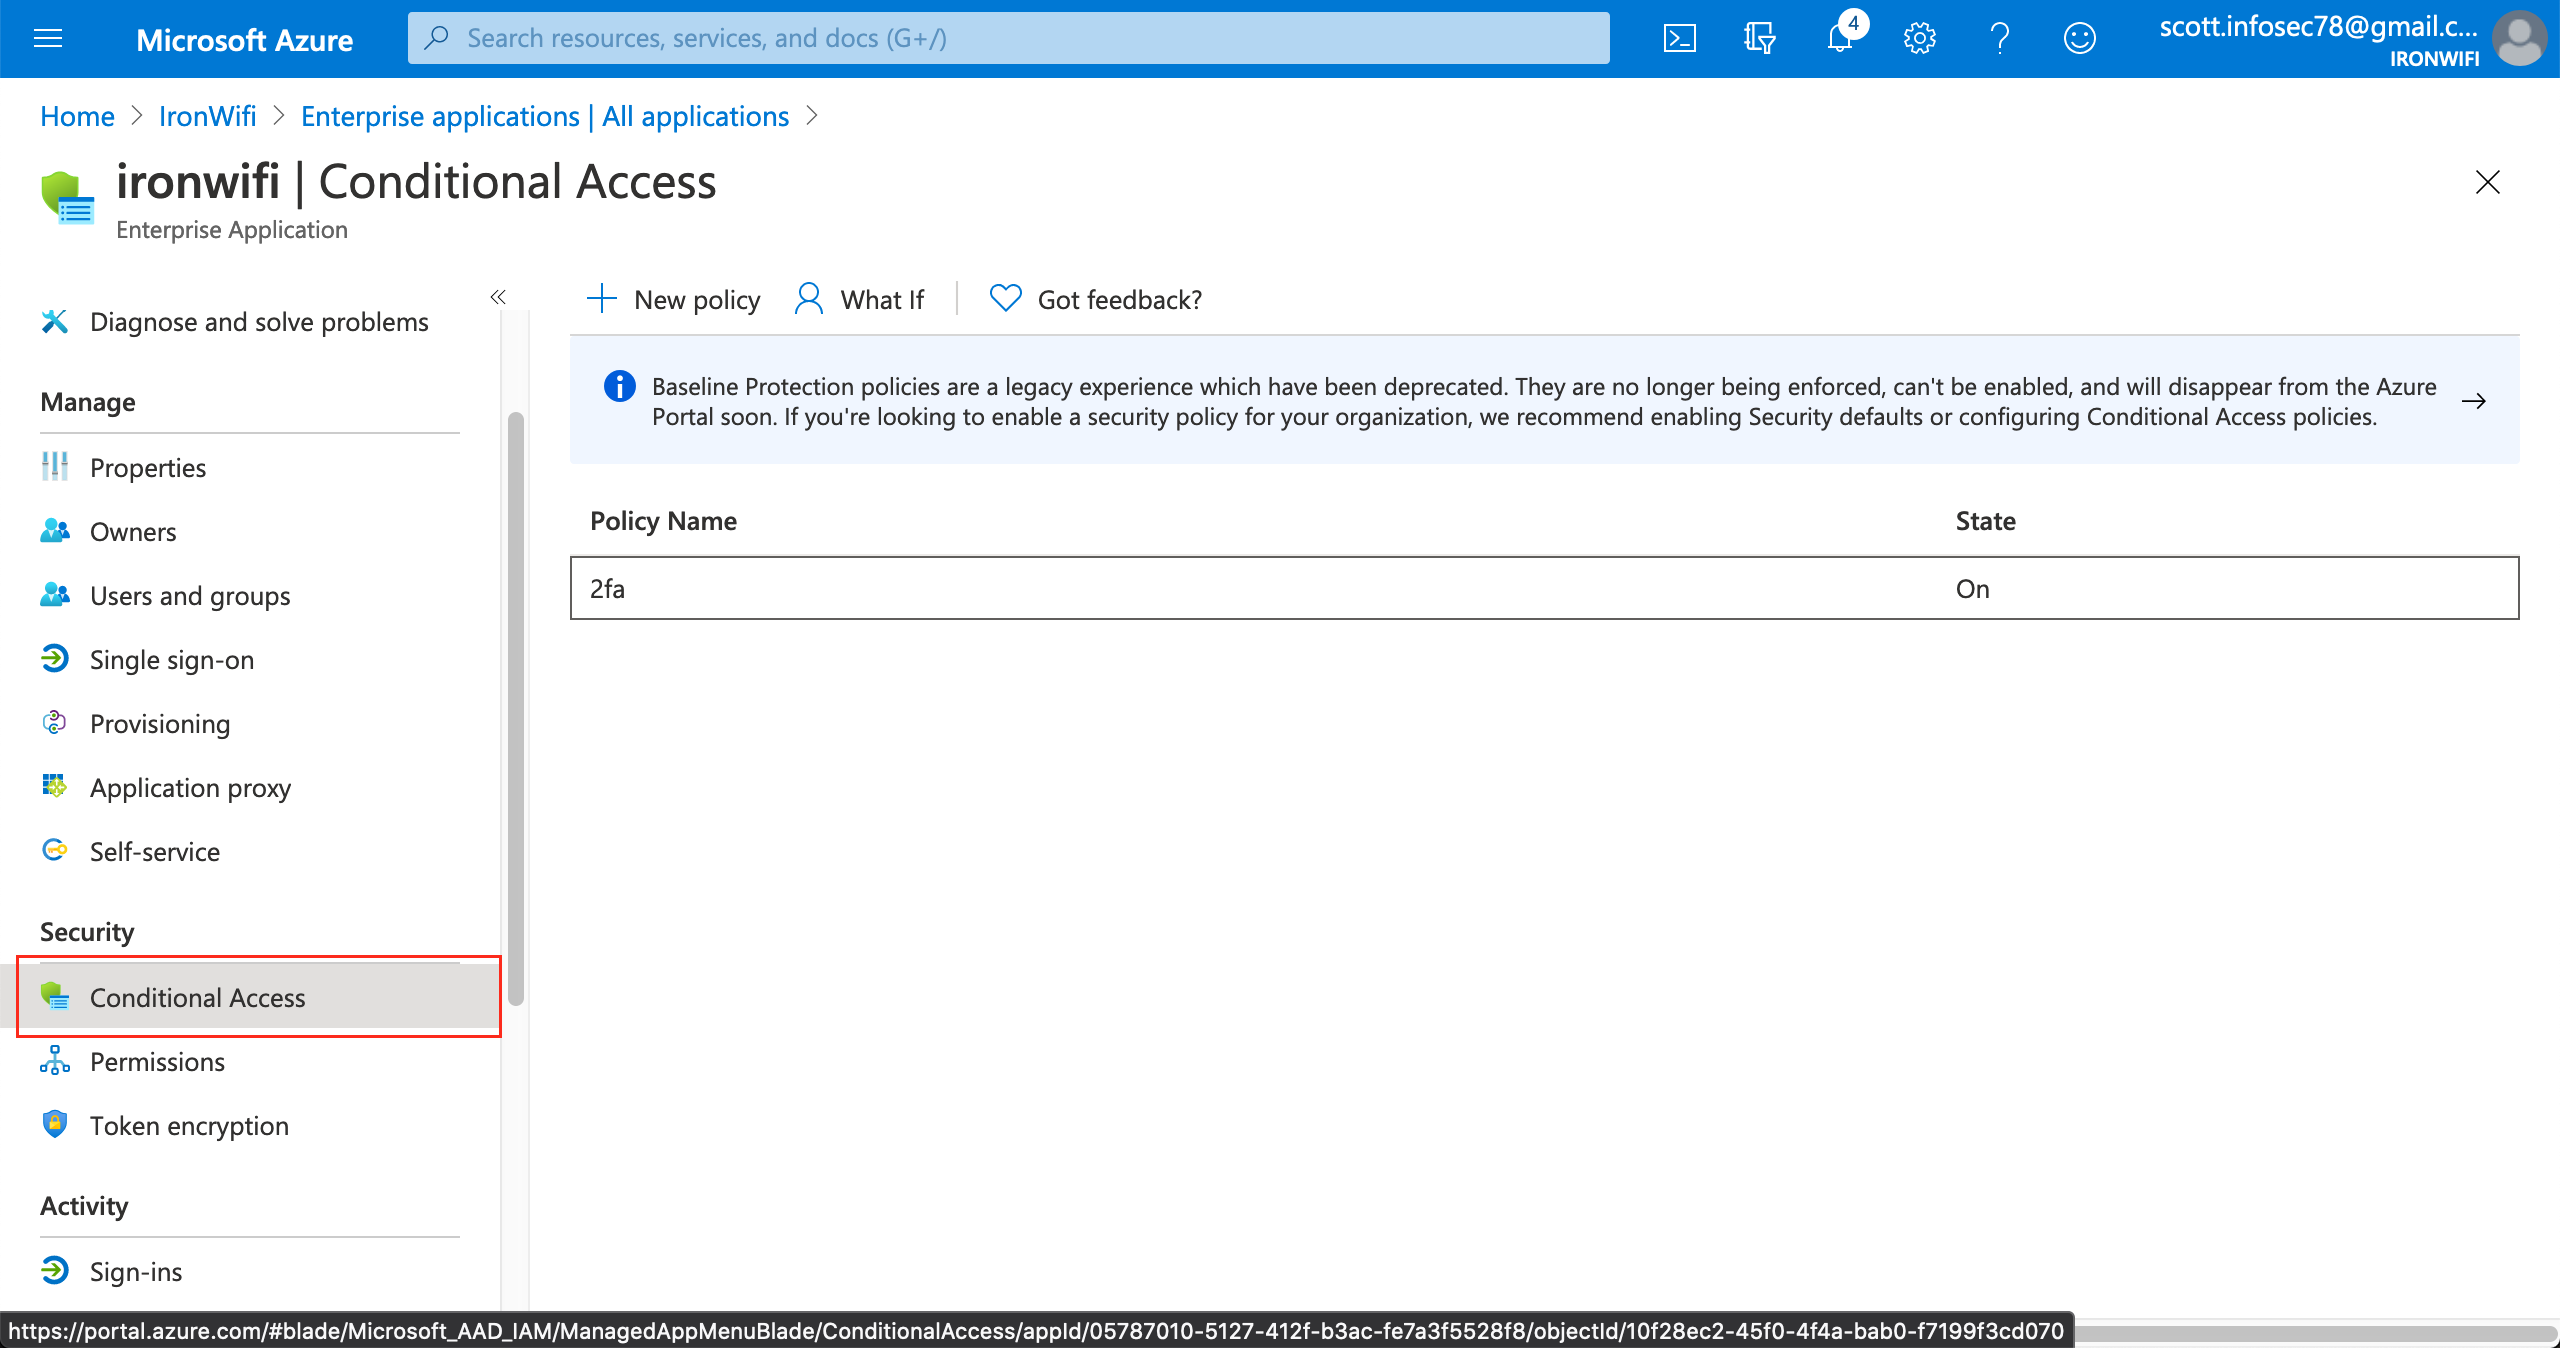
Step 1: Access Conditional Access
- Log into Azure Portal
- Navigate to Microsoft Entra ID > Enterprise applications
- Select your IronWiFi application
- Click Conditional Access in the left menu
Step 2: Create New Policy
- Click New policy
- Name the policy: "IronWiFi MFA Policy"
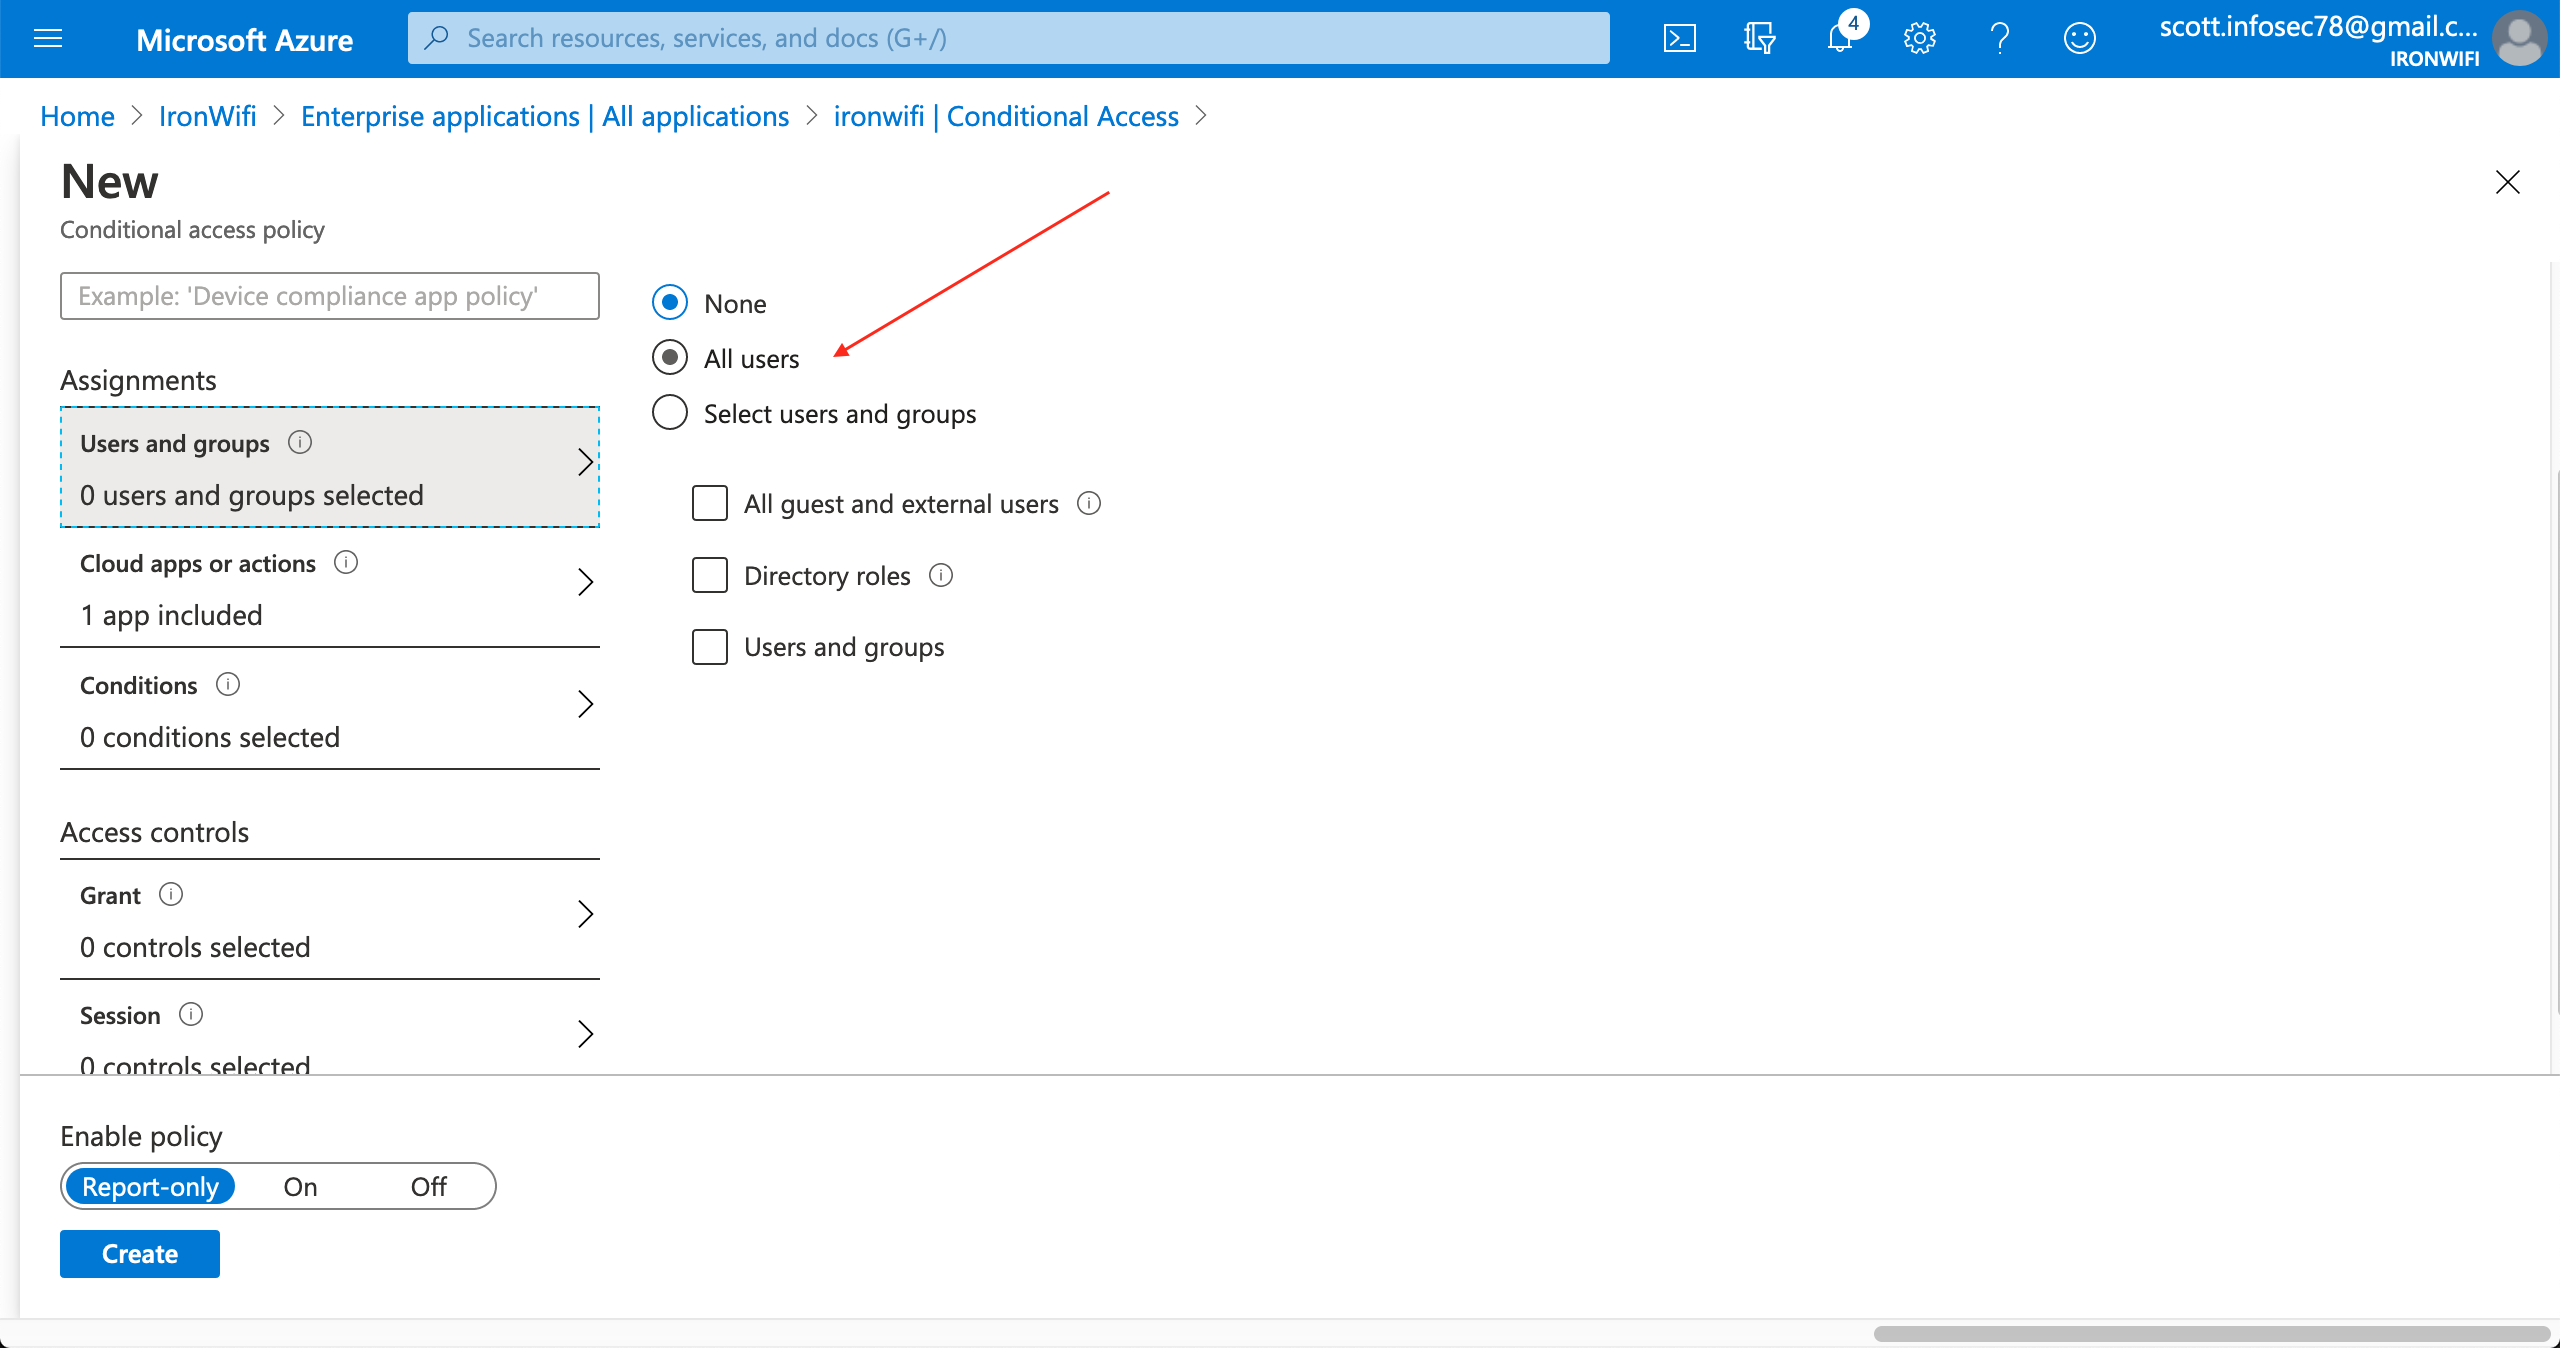
Step 3: Configure Assignments
Users:
- Under Users, click All users (or select specific groups)
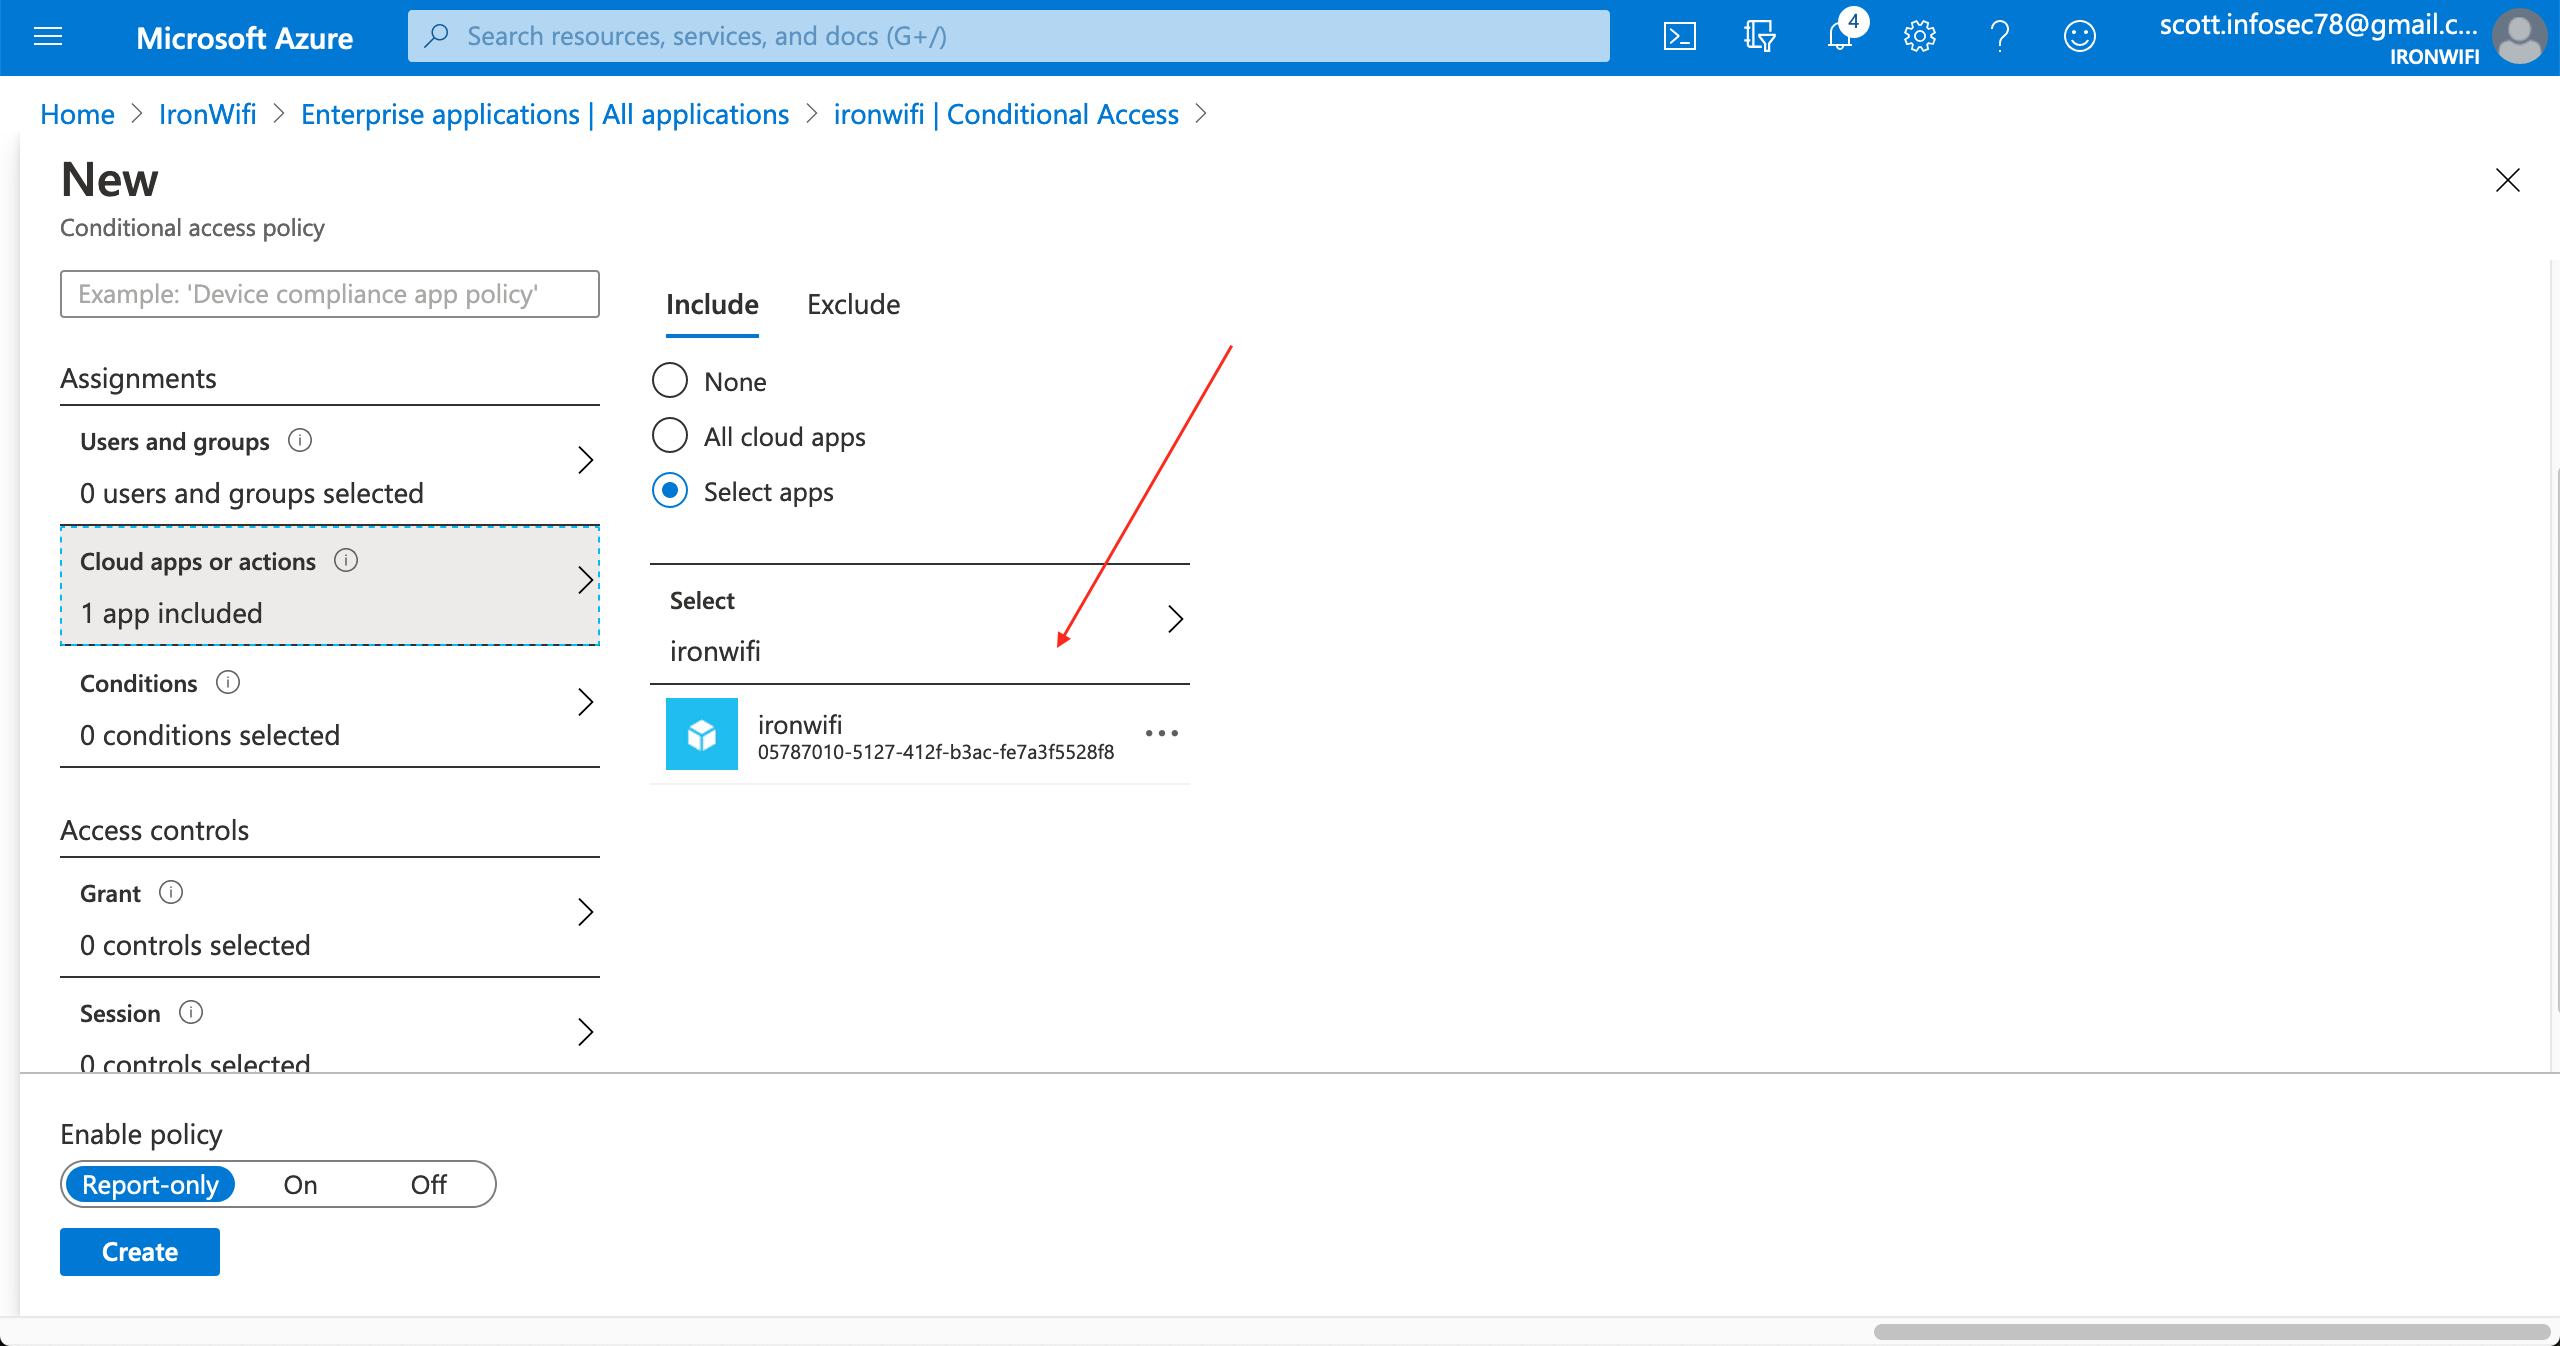
Cloud apps:
- Under Target resources > Cloud apps
- Select Select apps
- Search for and select your IronWiFi application
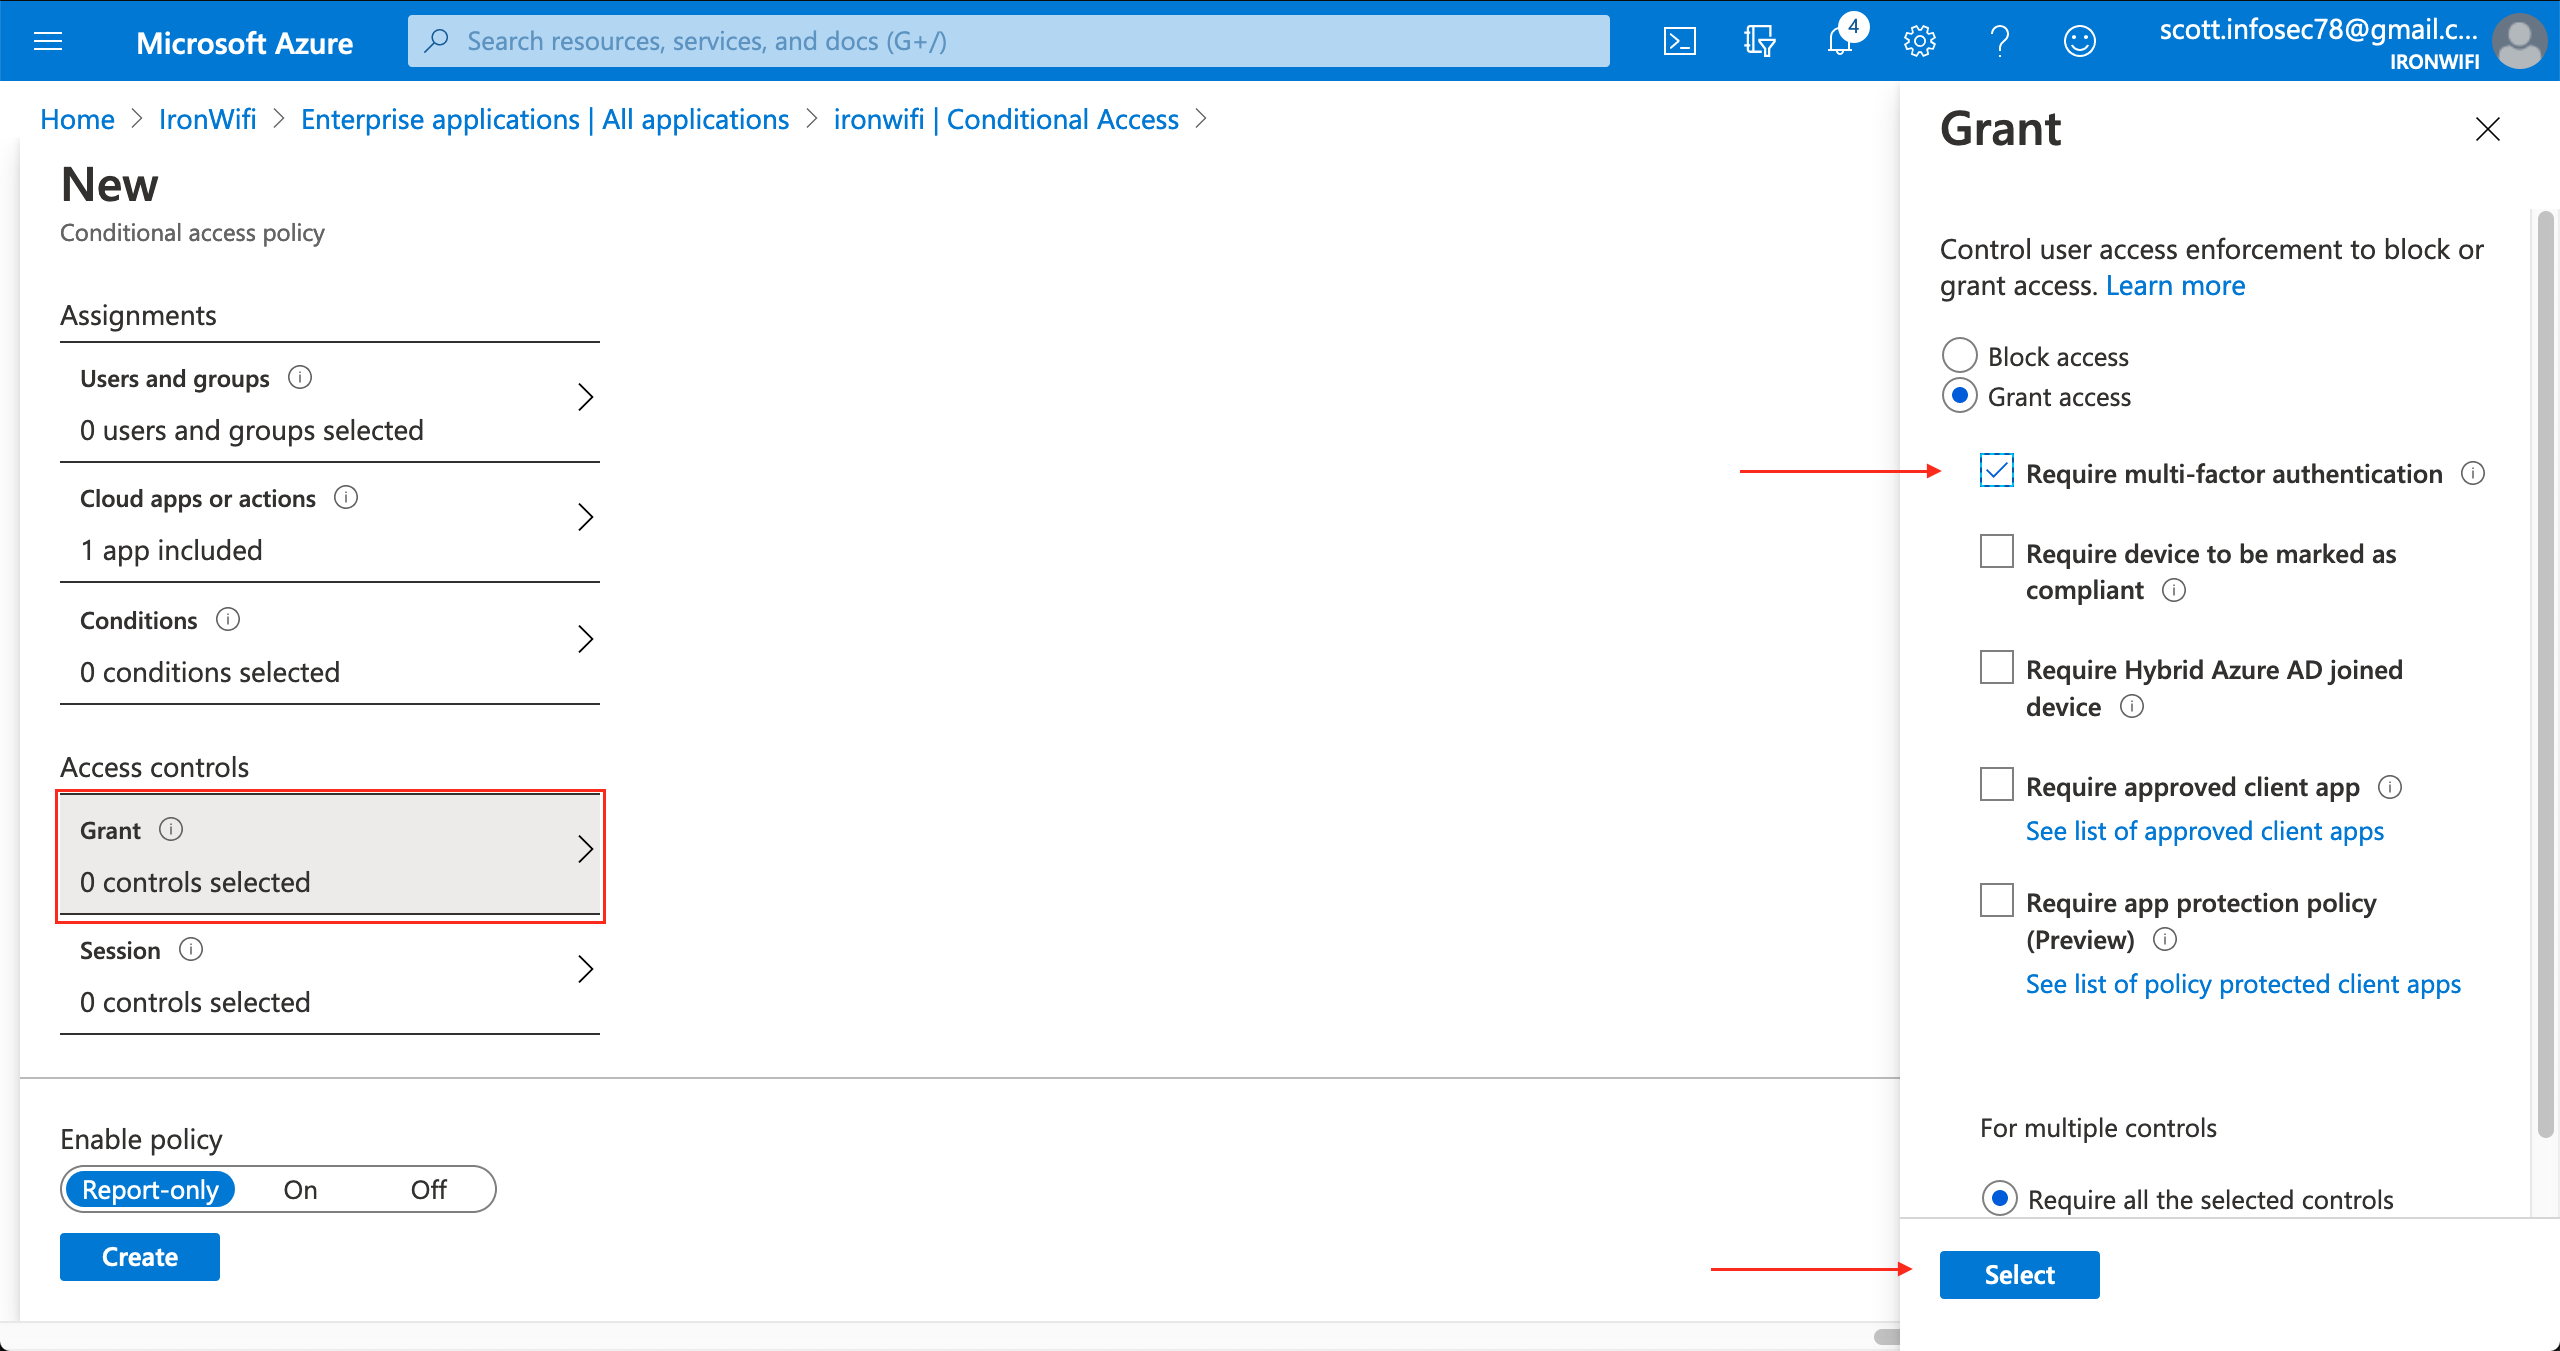
Step 4: Configure Access Controls
- Under Grant, click 0 controls selected
- Select Grant access
- Check Require multifactor authentication
- Click Select
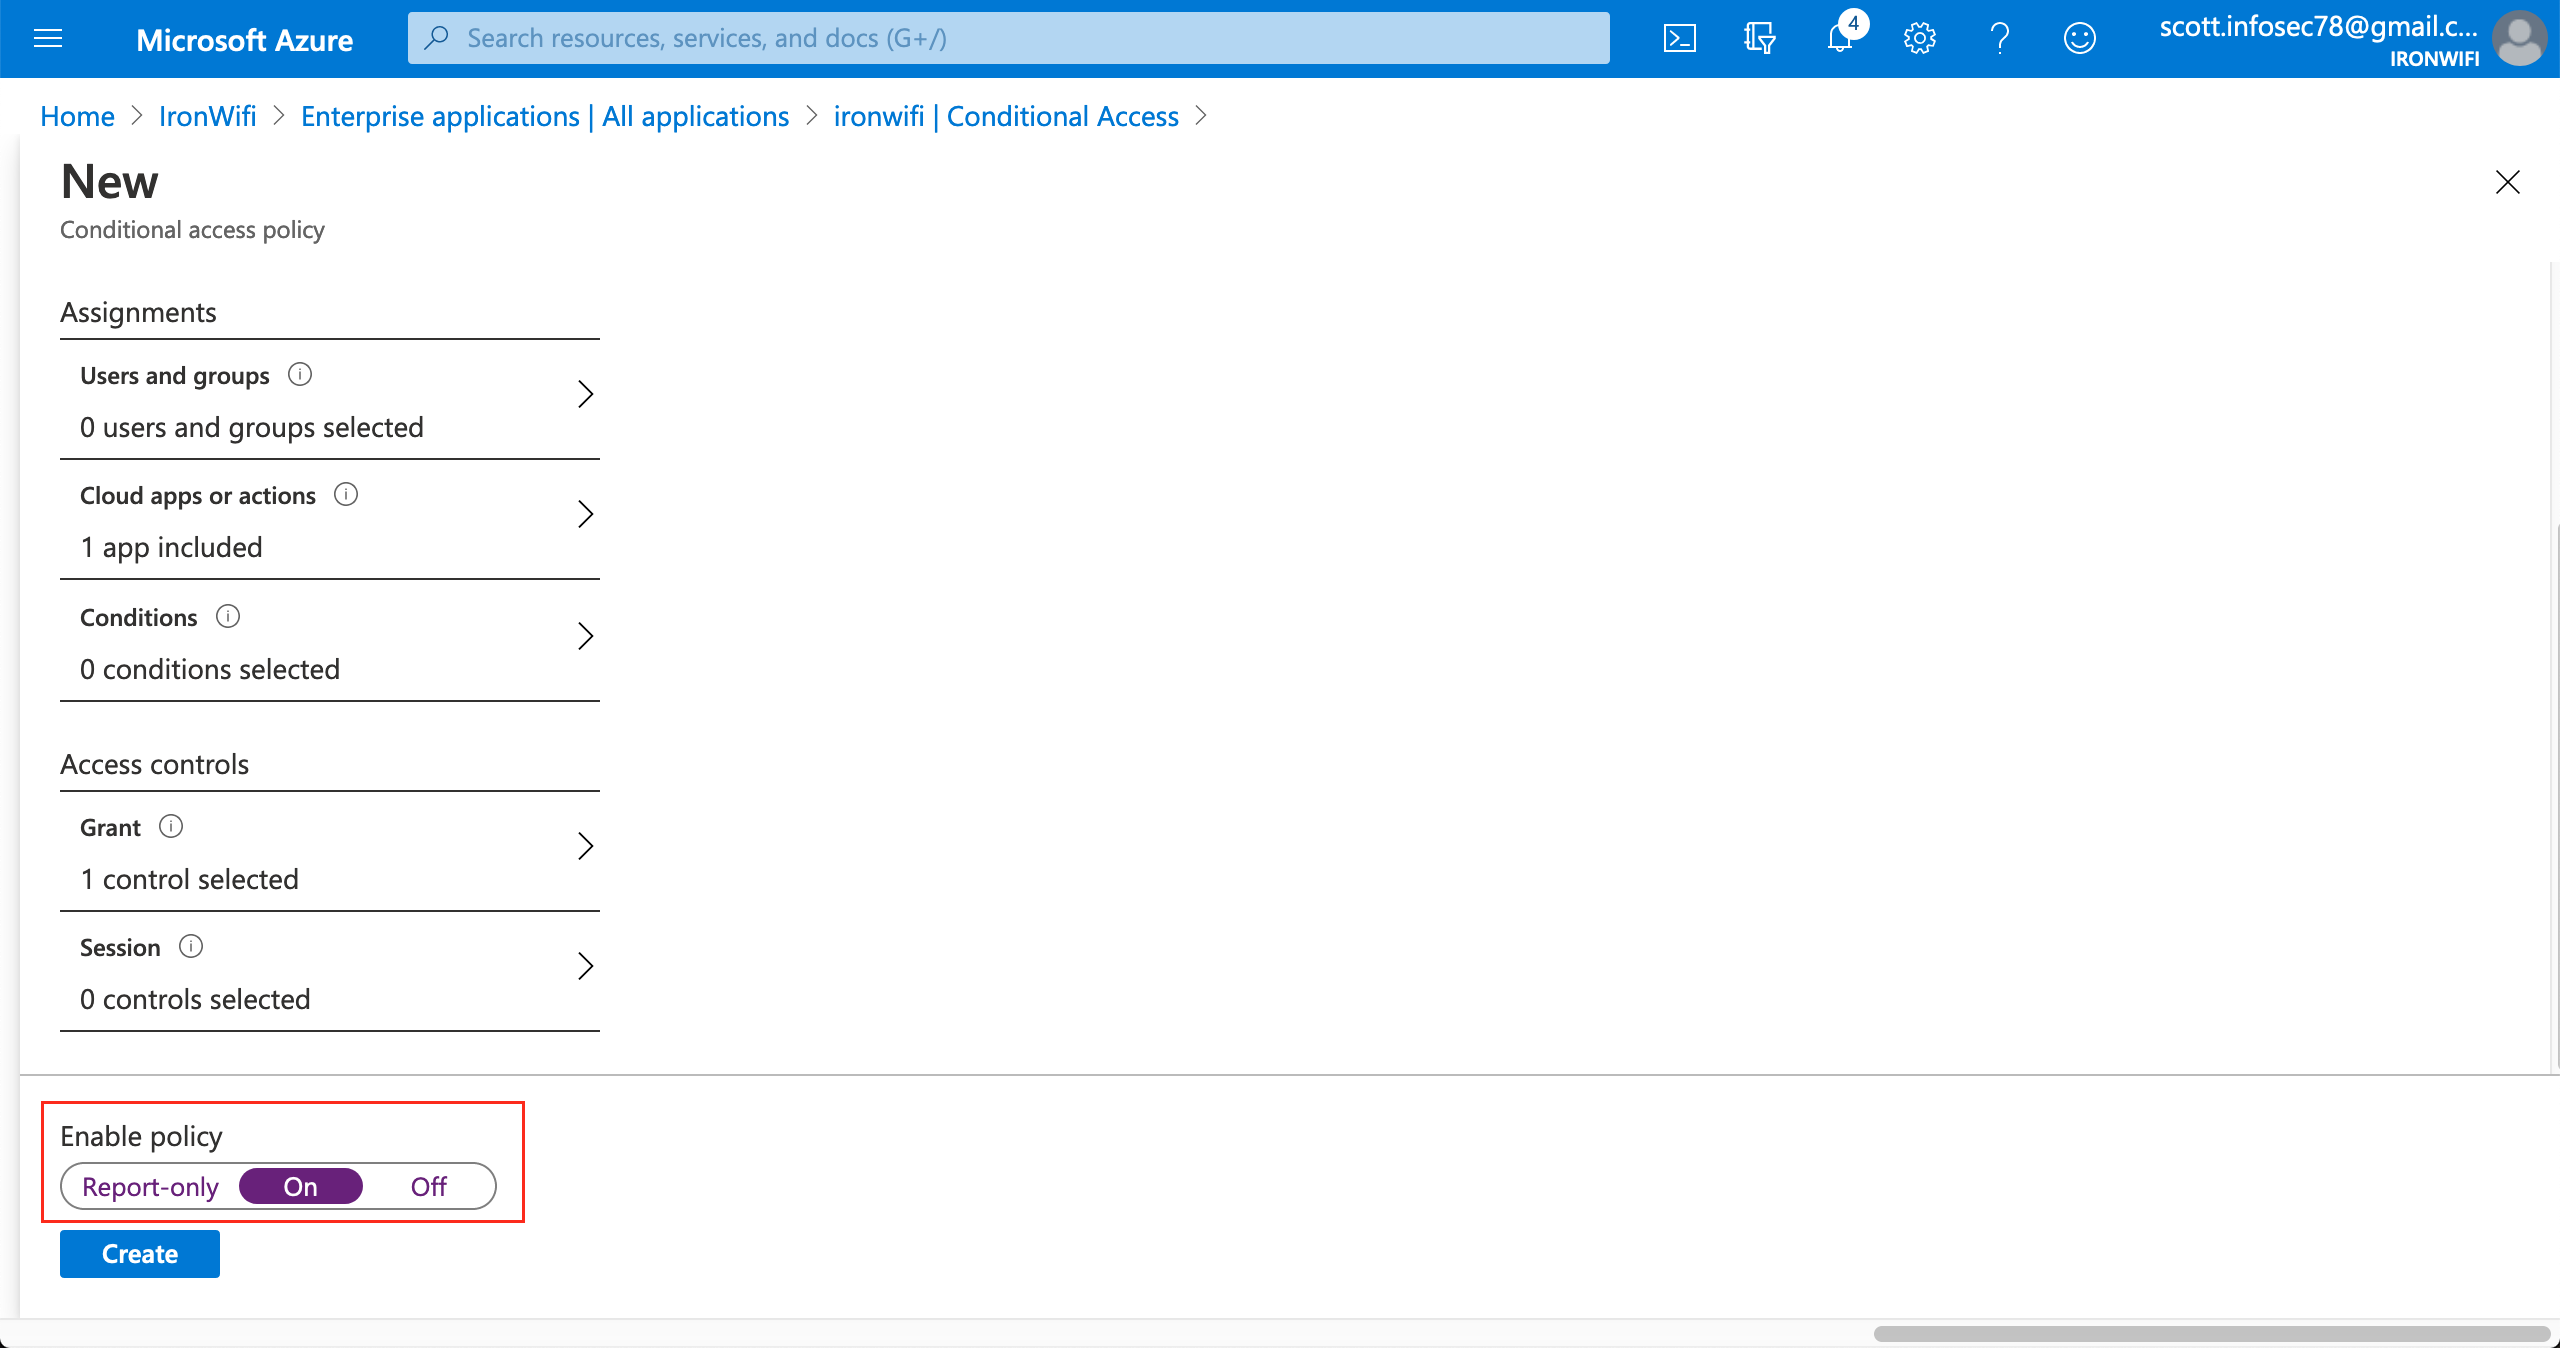
Step 5: Enable the Policy
- Under Enable policy, select On
- Click Create
How It Works
- User connects to WiFi and reaches captive portal
- User clicks Microsoft login (SAML or OAuth)
- Microsoft Entra ID checks Conditional Access policies
- If MFA is required, user completes MFA challenge
- Upon success, user is granted network access
Considerations
- MFA prompts appear during captive portal login
- Location-based policies apply (user's IP during auth)
- Device compliance can be enforced (if device is Entra-joined)
- Sign-in frequency policies may require re-authentication
Hybrid Environments
For organizations with on-premises AD:
Microsoft Entra Connect
Sync on-premises users to Microsoft Entra ID:
- Deploy Microsoft Entra Connect
- Configure sync options
- Enable password hash sync or pass-through auth
- IronWiFi authenticates via Microsoft Entra ID
Pass-Through Authentication
Use on-premises credentials:
- Enable Pass-Through Authentication
- Deploy authentication agents
- Users authenticate against on-premises AD via Azure
Troubleshooting
SAML Errors
Invalid Signature:
- Re-download certificate from Azure
- Verify certificate hasn't expired
- Check for correct encoding (Base64)
User Not Found:
- Verify User Identifier is set to in Azure
user.mail - Check NameID Format is
urn:oasis:names:tc:SAML:1.1:nameid-format:emailAddress - Confirm user exists in Microsoft Entra ID
SAML Response Error:
- Verify Entity ID matches exactly between Azure and IronWiFi
- Check Reply URL (ACS URL) is correct for your region
- Ensure certificate hasn't been rotated in Azure
OAuth Errors
Redirect URI Mismatch:
- Verify the redirect URI in Azure matches your IronWiFi region exactly
- Common URIs:
https://us-west1.ironwifi.com/api/signin/azure
Invalid Client Secret:
- Client secrets expire - check expiration date in Azure
- Create a new secret and update IronWiFi configuration
Permission Denied:
- Ensure permission is granted
User.Read - Click "Grant admin consent" in Azure if required
Connector/Sync Issues
Authorization Failed:
- Verify redirect URI is set to
https://console.ironwifi.com/api/oauth2callback - Check you're signing in with an admin account
- Try removing and re-adding the connector
Permission Denied:
- Verify permission is granted
Directory.Read.All - Ensure admin consent was granted (green checkmark in Azure)
- Re-consent by clicking "Grant admin consent"
No Users Syncing:
- Verify group selection in connector settings
- Check that selected groups have members
- Review connector logs in IronWiFi Console
Client Secret Expired:
- Create a new client secret in Azure
- Update the secret in IronWiFi connector settings
- Set a calendar reminder for future expiration
Best Practices
- Use groups - Manage access via Entra ID security groups
- Enable auto-sync - Keep users current with scheduled sync
- Monitor sign-ins - Review Entra ID sign-in logs regularly
- Test thoroughly - Verify with test users before rollout
- Track secret expiration - Set calendar reminders for client secret renewal
- Use OAuth for simplicity - SAML for enterprise features, OAuth for quick setup
- Enable Conditional Access - Add MFA for sensitive networks
- Document configuration - Record settings for compliance and disaster recovery
Was this page helpful?