Using RadSec Secure Radius on Fortigate
Enable RadSec support in IronWiFi Console and obtain your RadSec Certificate Bundle
Go to this link to enable RadSec on your account and download your secure certificate bundle.
Configure Fortigate / FortiAP to use IronWiFi Secure RadSec Servers
This guide is based on the FortiOS v7.4 and has to be configured using CLI
- Go to System > Certificates [if the Certificate are not visible as a menu item, go to System > Feature Visibility and enable them
- Unpack the zip containing your certificate bundle
- Select Create/Import > CA Certificate
- Select Type - File and click on + Upload to open the file selector.
- Select iw-rsa-root-ca.cert.pem and click OK to upload.
- Repeat the steps above and upload iw-rsa-radsec-signing-ca.cert.pem
- You should see both certificates added in the Remote CA section, take a note of the name that has been assigned to RadSec Signing CA, in the example below it is CA_Cert_2

- Select Create/Import > Certificate
- Click on Import Certificate
- Click on Type - Certificate
- Click on Certificate file and upload yor client certificate from the bundle [ending in crt.pem]
- Click on Key file and upload your client certificate key from the bundle [ending in key.pem]
- Click on Create
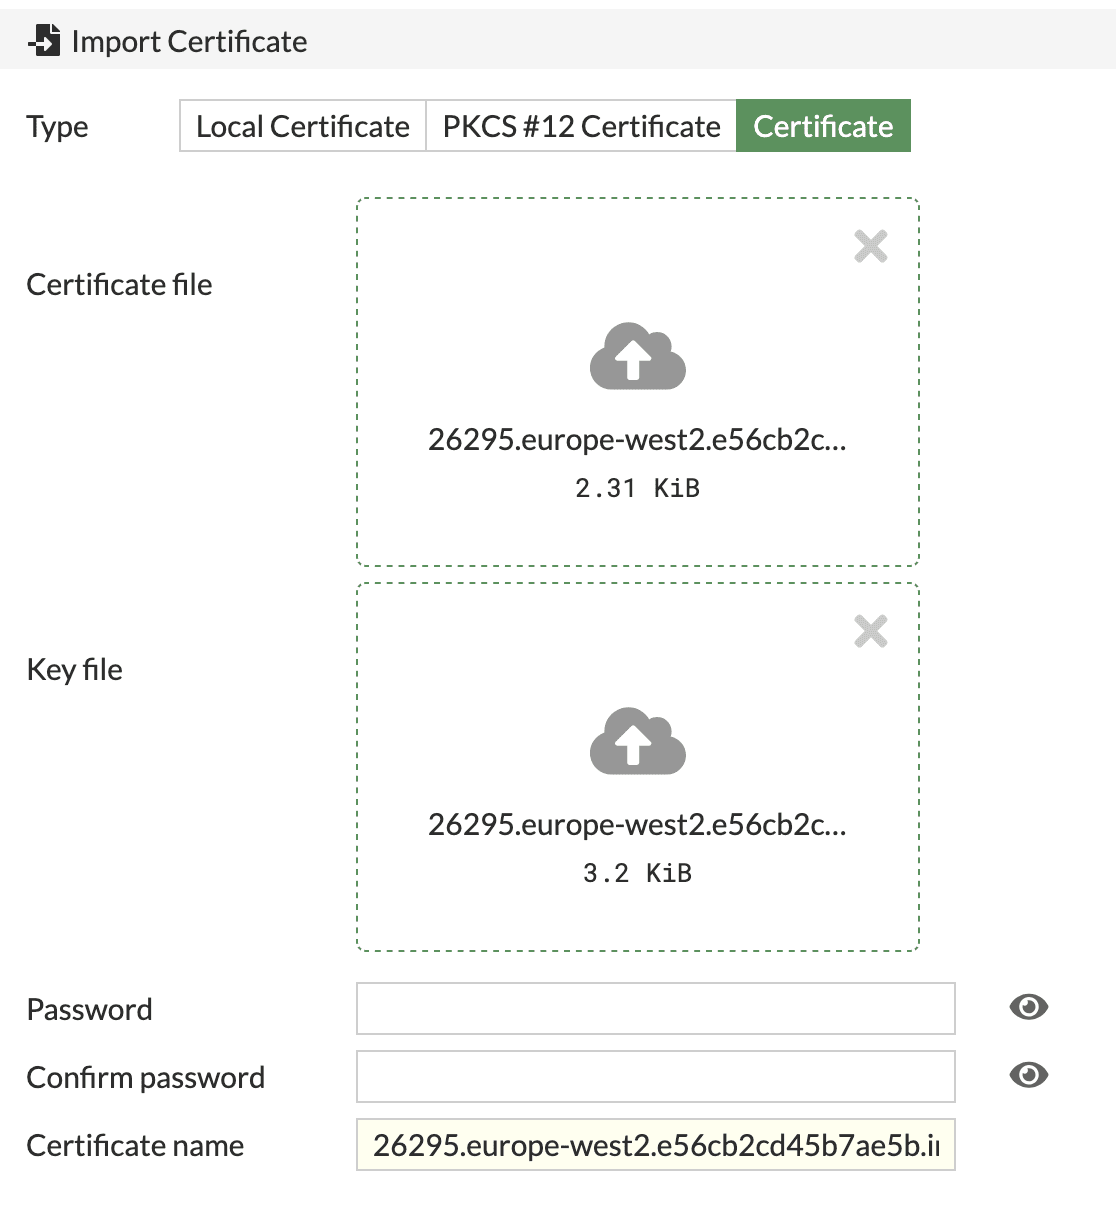
- Confirm if the certificate that you have added is visible in Local Certificate section
- Log in via SSH to your device, or click on >_ in your GUI to open the console
- Configure the server using the commands below:
- config user radiusedit IW-RadSecset server <your.server.ip>set secret radsecset acct-interim-interval 600set transport-protocol tlsset auth-type papset ca-cert <your RadSec Issuing CA Name>set client-cert <your certificate name>set server-identity-check disableconfig accounting-serveredit 1set status enableset server <your.server.ip>set secret radsecendendnext
- Go to Users & Authentication > Radius Servers, double click on the Radius server name that your have just created and confirm that it shows Successful in Connection Status
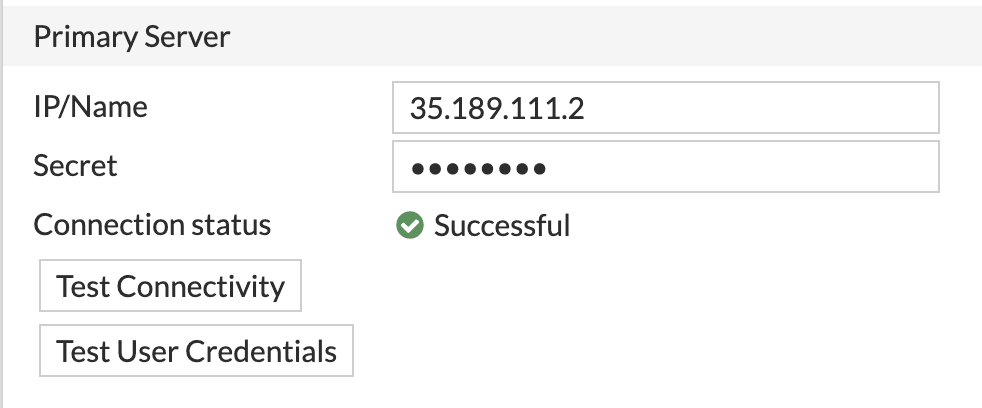
- You can test authentication with your user credentials by clicking on Test User Credentials
Related Articles
FortiGate wireless LAN controller - Passpoint Configuration
Prerequisites Access to the FortiGate CLI as a user with administrative privileges. Information about the assigned RADIUS servers (Server IP address, port numbers, shared secrets): Access to the IronWiFi Management Console - Sign in or Open Account ...Fortigate / FortiAP
This page explains the Captive Portal configuration for Fortigate hardware and authentication via IronWiFi. IronWiFi Console Configuration Log into the IronWiFi console or register for free Create a new network After that, create a new captive ...Aruba Central OpenRoaming configuration with RadSec
Prerequisites Access to the Aruba Central dashboard as a user with administrative privileges. Access to the IronWiFi Management Console - Sign in or Open Account RadSec enabled on your Network as detailed here (you will need to download the ...IronWiFi RadSec Secure Radius Servers
RadSec General Information RadSec or Radius over TLS is an extension to the RADIUS protocol, that uses secure tunnels estabilished between the Radius Client and Radius Server to encapsulate Authentication, Authorization, and Accounting (AAA) protocol ...MikroTik ROS v7 OpenRoaming with RadSec
Due to the changes in RouterOS firmware, RadSec stopped working in the version 7.15 (and later). If you want to use RadSec, our recommendation is to use ROs 7.14.3 Sign in to the IronWiFi Management Console Go to Networks -> Select the network you ...