Ubiquiti Unifi Hotspot [Network v8 and v9]
IronWiFi Console Configuration
- Log into the IronWiFi console or register for free
- Create a new network (skip if you already have one)
- After that, create a new captive portal, with vendor Ubiquiti UniFi (Legacy)
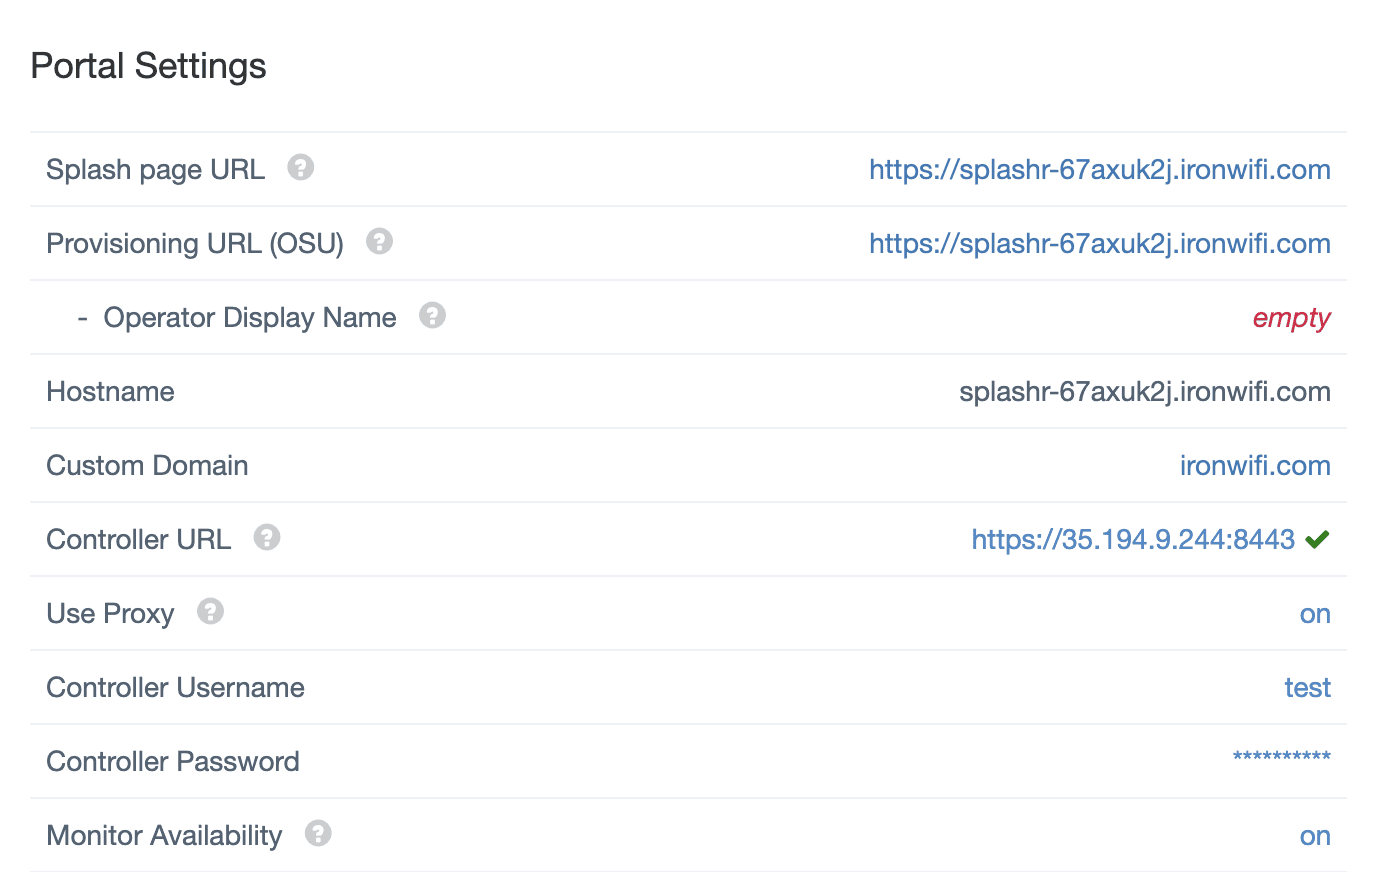
- IronWiFi servers need direct access to your Ubiquiti Controller (SW, Cloud Key, DreamMachine,...) so we can authorize connecting devices. Enter the Controller URL or leave blank if the Controller public address is the same as connecting devices IP address (router public IP address).
- Controller URL - https://your_public_static_ip:8443 or https://your_public_static_ip:443 (depending on your controller type)
Make sure it is the PUBLIC IP address, and your controller is reachable through the Internet (not private address like 192.168.., 172.16.., or 10...*). You might need to configure port forwarding on your Internet router and firewall. If you are not sure, please consult with your ISP provider.
If you are using the UniFi Official Hosting: Copy the Inform URL from the dashboard after logging in and transform it by changing http to https and removing :8080/inform from the end of it.For example of the inform URL is:the controller URL will be:
- Decide if you want to enable the Use Proxy feature. If enabled, we will be connecting to your controller from static IP addresses 35.184.225.240, or 35.201.240.80, or 35.195.230.167.
If you disable this feature, we will be connecting from dynamic IP range - https://cloud.google.com/appengine/kb/#static-ip. - Enter Controller username (administrator privileges, you can create a new user in your controller) and password. You must use account with local access, not UniFi Cloud accounts. Test the credentials to make sure they are working without issue - asking to change the password on first access for example.
- Enable Controller monitoring
- Make note of the Hostname, you will need it later.
- Add a rule to the Unifi firewall alowwing remote access to the Unifi Controller on port 443

Ubiquiti Controller Configuration
Log in to your UniFi controller and click the Consoles icon (Top left).
- Click on the Network icon button beneath your device.

Click the Settings icon (bottom left corner).
In the sub menu that appears next to the settings icon, click WiFi
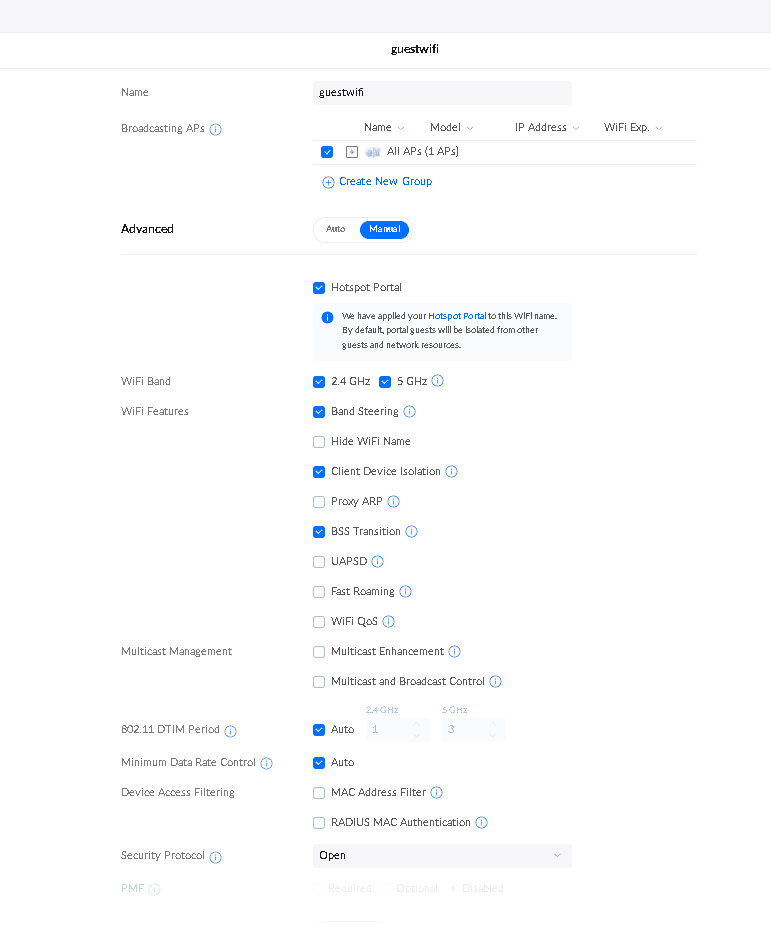
- Click Create New -> under Advanced heading activate Manual -> configure with:
- Name/SSID - Guest WiFi (or whatever you wish)
- Hotspot Portal - Enabled
- Security Protocol- Open
- Leave the rest of the settings as is.

Click Add WiFi Network to apply.
Next, in the left menu, click Insights.
Then, click Hotspot (top middle of screen).
In the right menu, click Authentication (top middle).
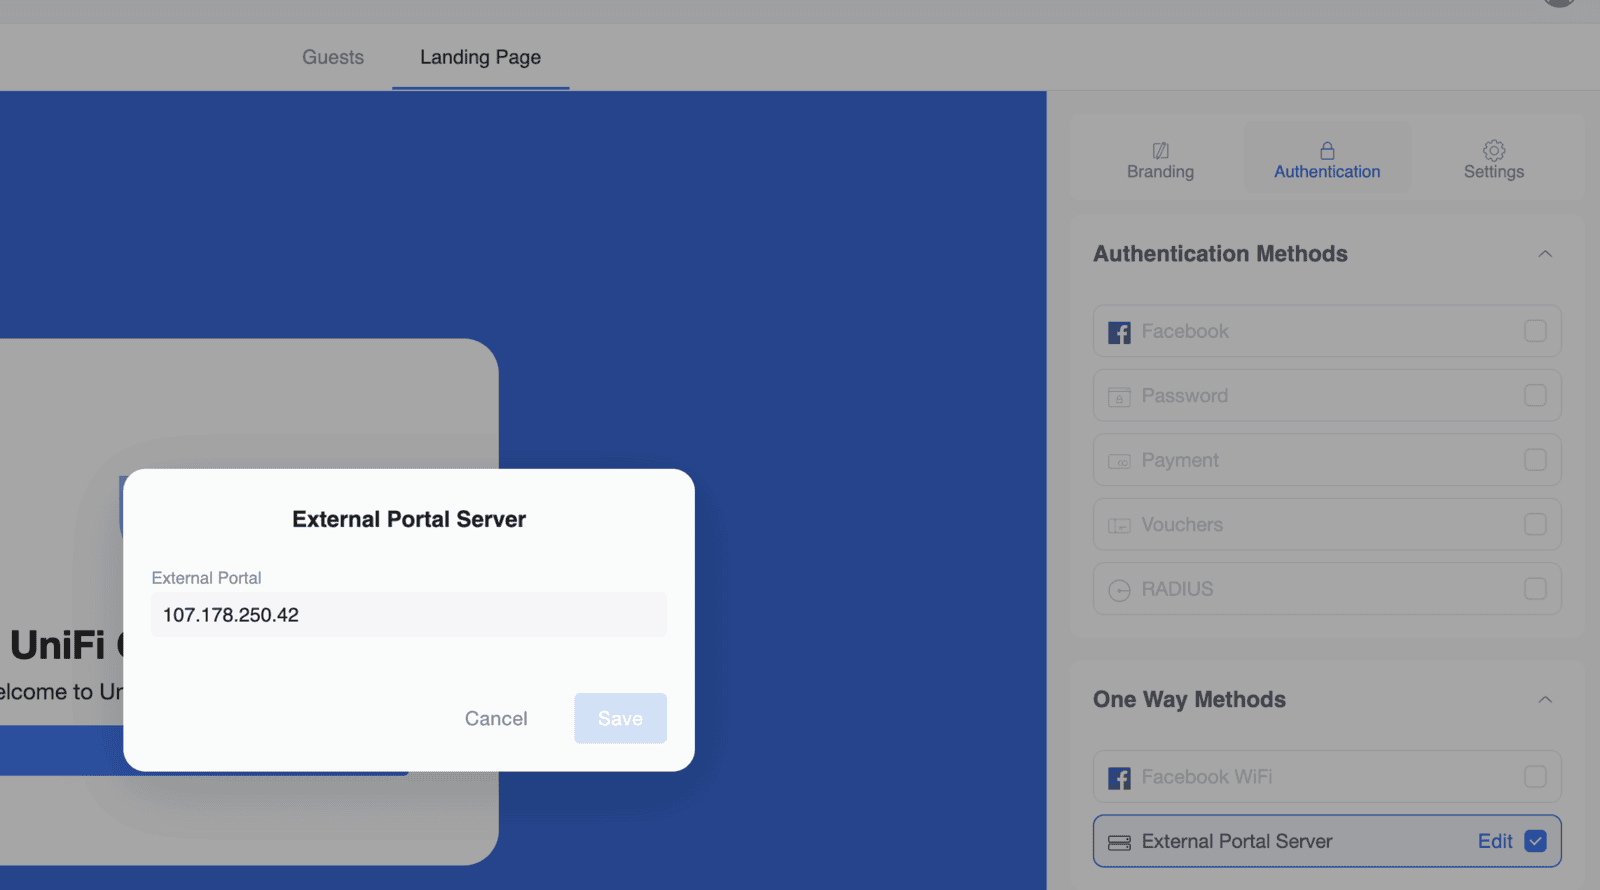
Under Authentication Methods -> External Portal Server -> click edit.
- External Portal: 107.178.250.42

Next, click Settings (top right)
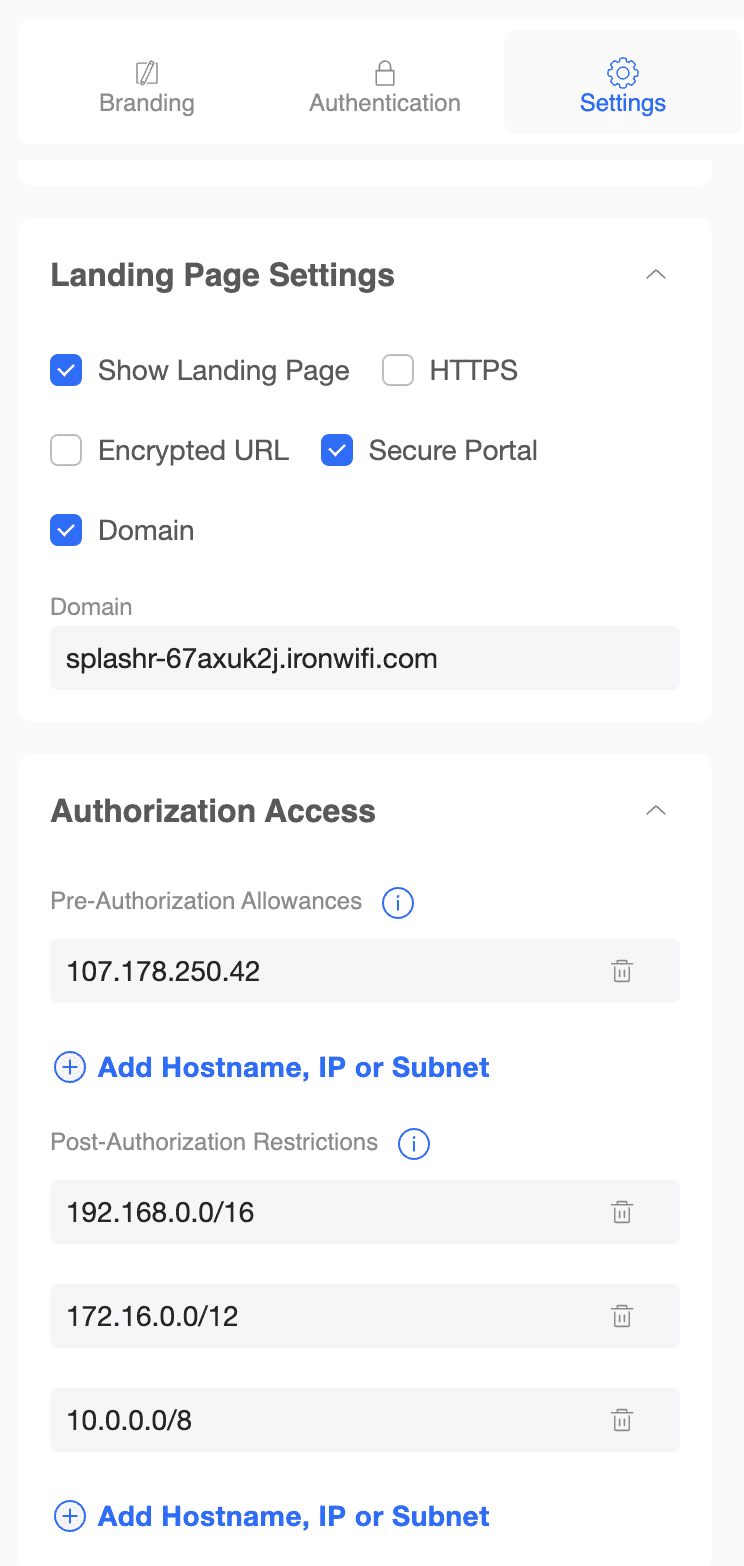
- Under Landing Page Settings -> Enable Show Landing Page, enable Secure Portal, enable Domain. Enter the Hostname from the captive portal page in IronWiFi console -> Networks -> Captive Portal (select captive portal) -> Portal Settings -> Hostname header - splashr-*****.ironwifi.com in our example.
- Under Authorization Access -> Pre-Authorization Allowances add the following IP address and domain:
- 107.178.250.42

If you wish to support social network logins, you also need to add further IP's as per below for each network you plan to support
Facebook - 31.13.24.0/21 - 31.13.64.0/18 - 45.64.40.0/22 - 66.220.144.0/20 - 69.63.176.0/20 - 69.171.224.0/19 - 74.119.76.0/22 - 103.4.96.0/22 - 129.134.0.0/16 - 157.240.0.0/16 - 173.252.64.0/18 - 179.60.192.0/22 - 185.60.216.0/22 - 204.15.20.0/22
Twitter - 199.16.156.0/22 - 199.59.148.0/22 - 199.96.56.0/21 - 192.133.76.0/22 - 104.244.42.0/24 - 104.244.43.0/24 - 104.244.46.0/24
LinkedIn - 91.225.248.0/23 - 103.20.94.0/23 - 108.174.0.0/22 - 108.174.4.0/24 - 108.174.8.0/22 - 108.174.12.0/23 - 144.2.0.0/22 - 144.2.192.0/24 - 216.52.16.0/23 - 216.52.18.0/24 - 216.52.20.0/23 - 216.52.22.0/24 - 65.156.227.0/24 - 8.39.53.0/24 - 185.63.144.0/24 - 185.63.147.0/24 - 199.101.161.0/24 - 64.152.25.0/24 - 8.22.161.0/24
NOTE: These IP ranges are subject to change depending on the social network setup.
Click Save (bottom right)
Next, Click Branding (Top Right)
Scroll down to the Success Landing Page header
Select Custom URL.
Enter the web address of your captive portal's success page from the Ironwifi Console. (On the Captive Portal settings page in the IronWiFi console click on Success Page -> Copy the web address and enter into the Custom URL input field.

Related Articles
Ubiquiti Unifi - Passpoint Configuration
This guide is for Network version 8.4.x and above ONLY. Ubiquiti has recently reintroduced Passpoint feature into their codebase. Further information about Unifi and Passpoint can be found on the Unifi website: Unifi Passpoint Prerequisites Access to ...Ubiquiti Unifi - OpenRoaming Configuration
This guide is for Network version 8.4.x and above ONLY. Ubiquiti has recently reintroduced Passpoint feature into their codebase. Further information about Unifi and Passpoint can be found on the Unifi website: Unifi Passpoint Prerequisites Access to ...Testing Stripe Payment Gateway (Client side) for Paid Hotspot Access
Create a new Captive Portal if it does not already exist. Networks -> Captive Portals -> New Captive Portal Enter Captive Portal Page Create a new Authentication Provider Set following values: Method: Paid Access Transaction Processor: Stripe (client ...What if I can't find the network I had previously created?
You don't see the network because you're in a different region. In the top right corner of the screen in your console, you can switch to non-regional, where you have a network as well as a captive portal.What if I can't find the network I had previously created?
You don't see the network because you're in a different region. In the top right corner of the screen in your console, you can switch to non-regional, where you have a network as well as a captive portal.