Meraki - OpenRoaming configuration
Prerequisites
- Access to the Meraki Dashboard as a user with administrative privileges.
- Supported Meraki device - this solution works with all devices of the MR series.
- Information about the assigned RADIUS servers (Server IP address, port numbers, shared secrets):
- Email or document that contains this information
OR - Access to the IronWiFi Management Console - Sign in or Open Account
- Email or document that contains this information
WPA2-Enterprise configuration
To start, you need to configure your Meraki with the exact same configuration required for supporting the WPA2 Enterprise service.
In the Meraki dashboard, configure the SSID and Access Control
- Log in to the Meraki dashboard
- Navigate to Wireless -> Access Control
- Select an SSID
- Enter an SSID name
- Change SSID status to Enabled
- Select Enterprise with my RADIUS server as the security type
- Select none for the splash page
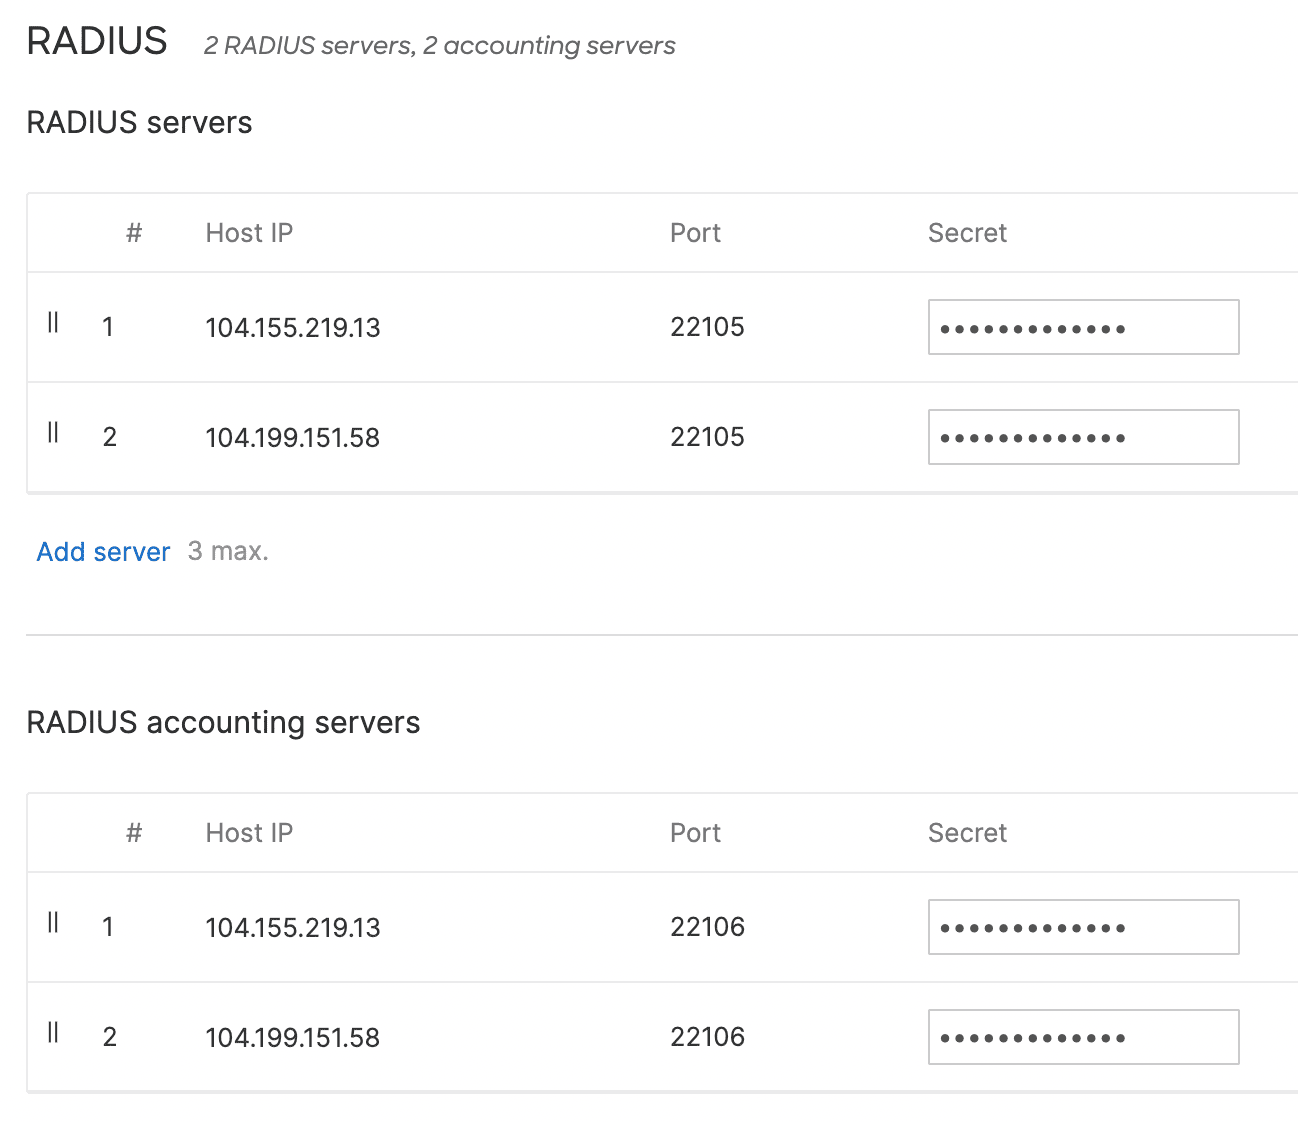
- Open RADIUS section, click Add server, and enter information about your assigned RADIUS authentication and accounting servers - RADIUS server IP addresses, port numbers, and secrets
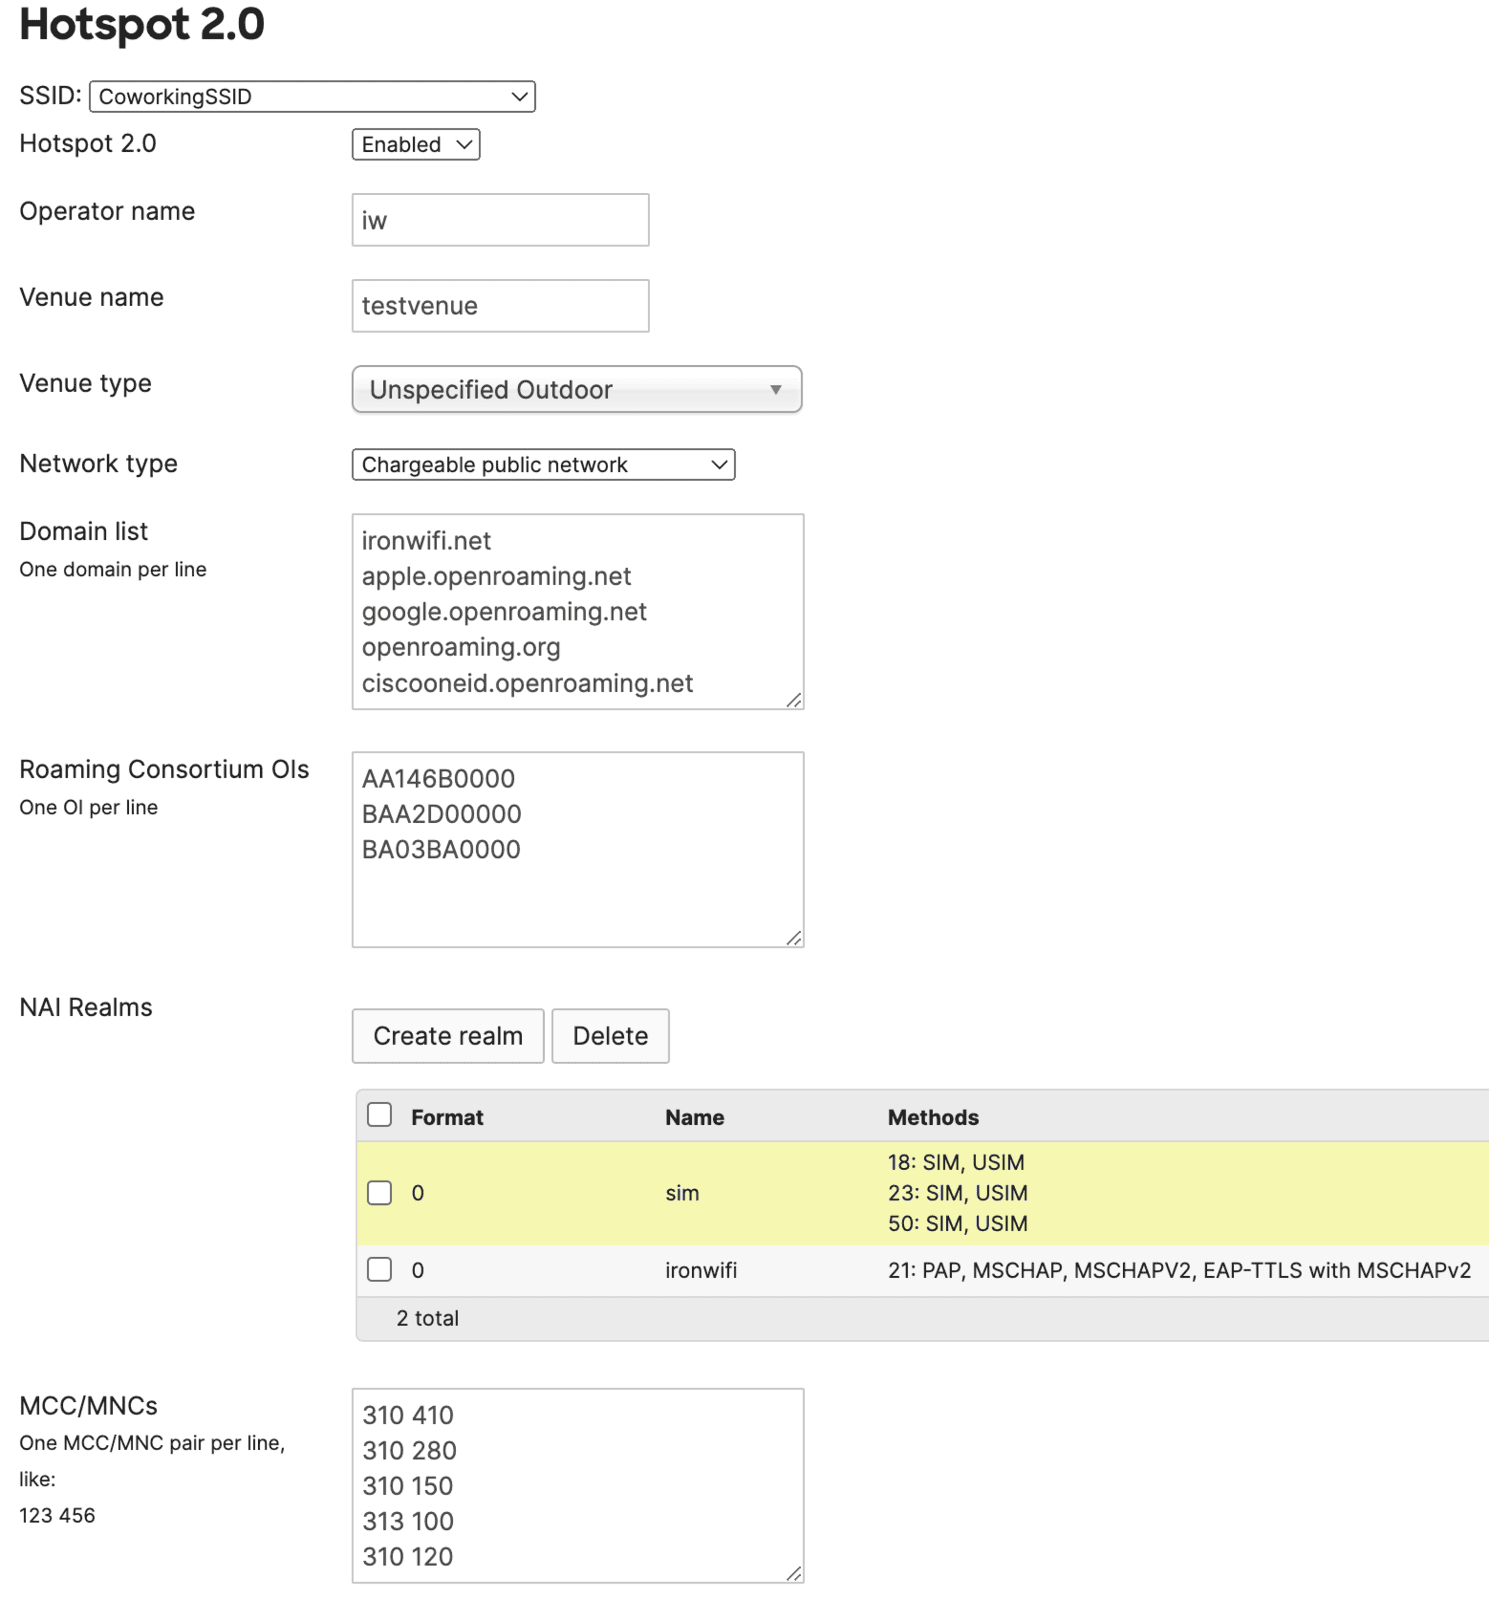
In the Meraki dashboard, configure Hotspot 2.0
- Click on Wireless -> Hotspot 2.0 -> and select the SSID from Step 2.
- Enable Hotspot 2.0
- Enter your venue name, select your venue type, and network type that best describes your network
- To the domain list, add the following:
- ironwifi.net
To enable OpenRoaming functionality, add also these domains - - apple.openroaming.net
- google.openroaming.net
- openroaming.org
- ciscooneid.openroaming.net
- ironwifi.net
- The following OI should be added to the Roaming Consortium list:
- AA146B0000
These additional OIs are needed to enable OpenRoaming - - BAA2D00000
- 5a03ba0000
- 004096
- AA146B0000
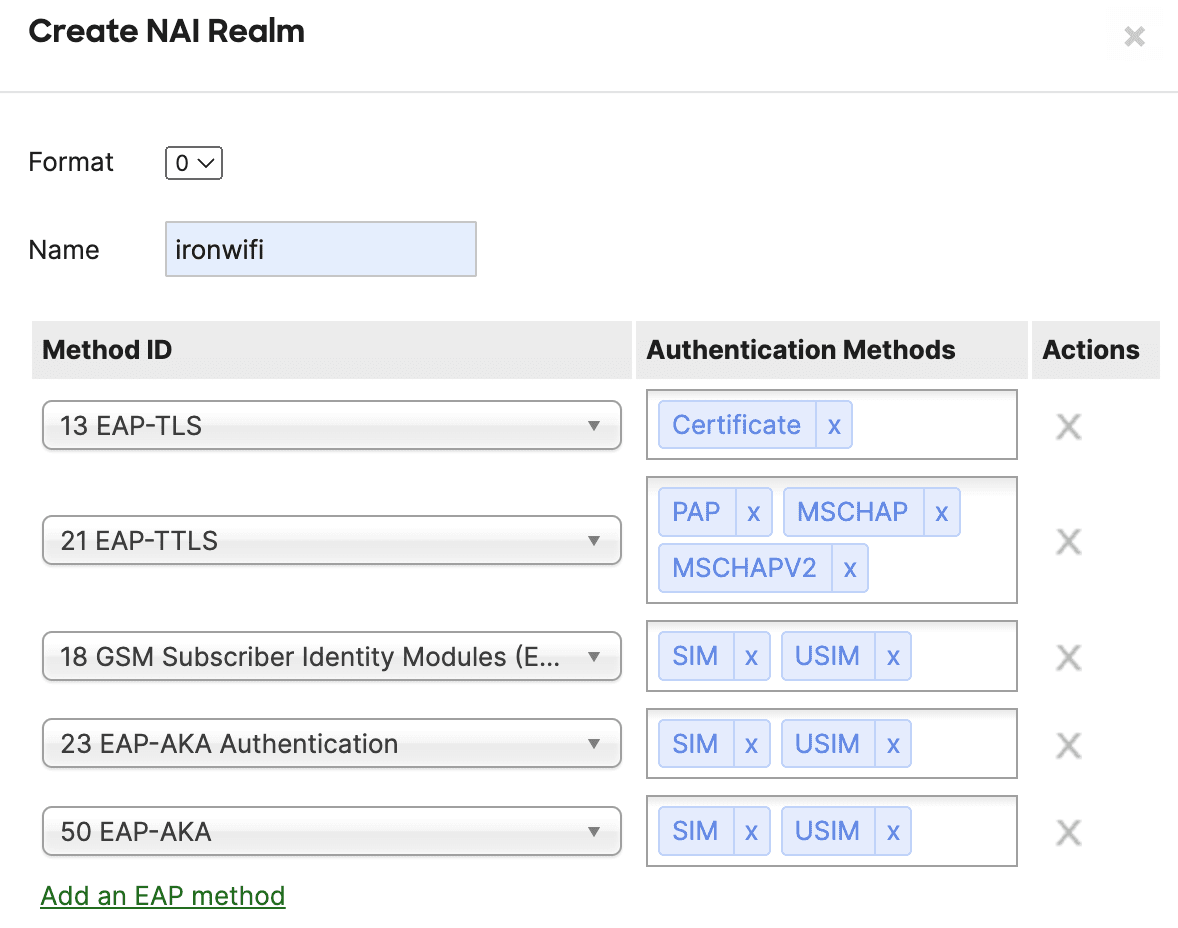
- Click on the Create realm button in the section NAI Realms and add the following:
- The format is 0
- Realm name - ironwifi
- Click Add an EAP method -> add Method ID and Authentication Methods:
- 13: EAP-TLS - Certificate
- 21: EAP-TTLS - PAP, MSCHAP, MSCHAPv2
The additional methods are needed for SIM card authentication - - 18: EAP-SIM: SIM, USIM
- 23: EAP-AKA: SIM, USIM
- 50: EAP-AKA: SIM, USIM
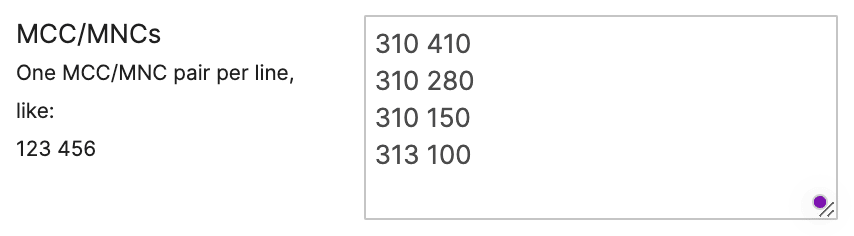
Next, enter the following pairs, one per line, in the MCC/MNC section below:
● 310 410
● 310 280
● 310 150
● 313 100
Click the Save Changes button.
This is an example of how the finished configuration should look like:
Install the Passpoint profile on your client devices
This feature is available only to customers with IronWiFi Captive Portal service enabled.
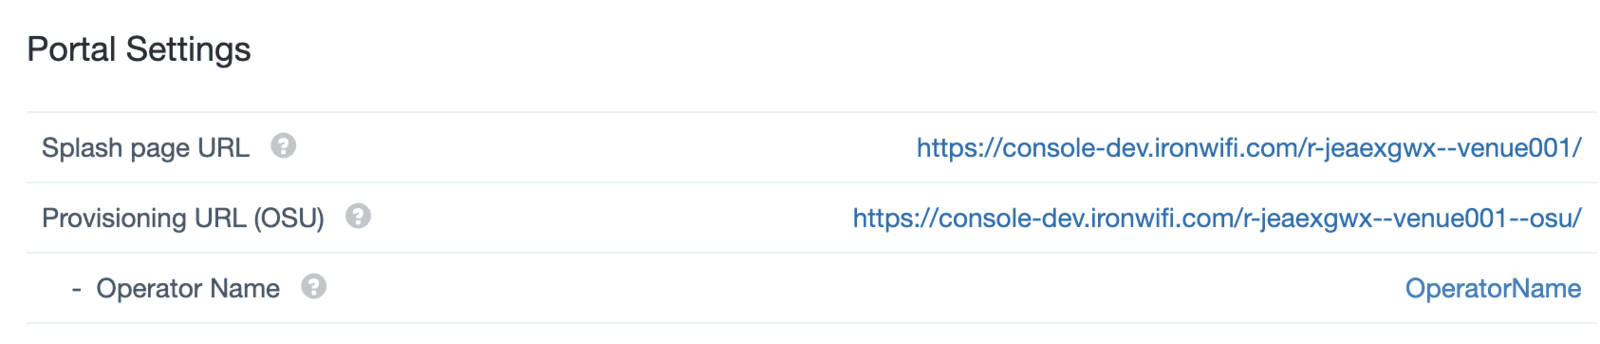
- Sign in to the IronWiFi Management Console -> Networks -> Captive Portals -> click portal name
- Under the Provisioning URL field on the Captive Portal settings page, add Operator name. This name will be displayed on your guests device to help them identify your network.
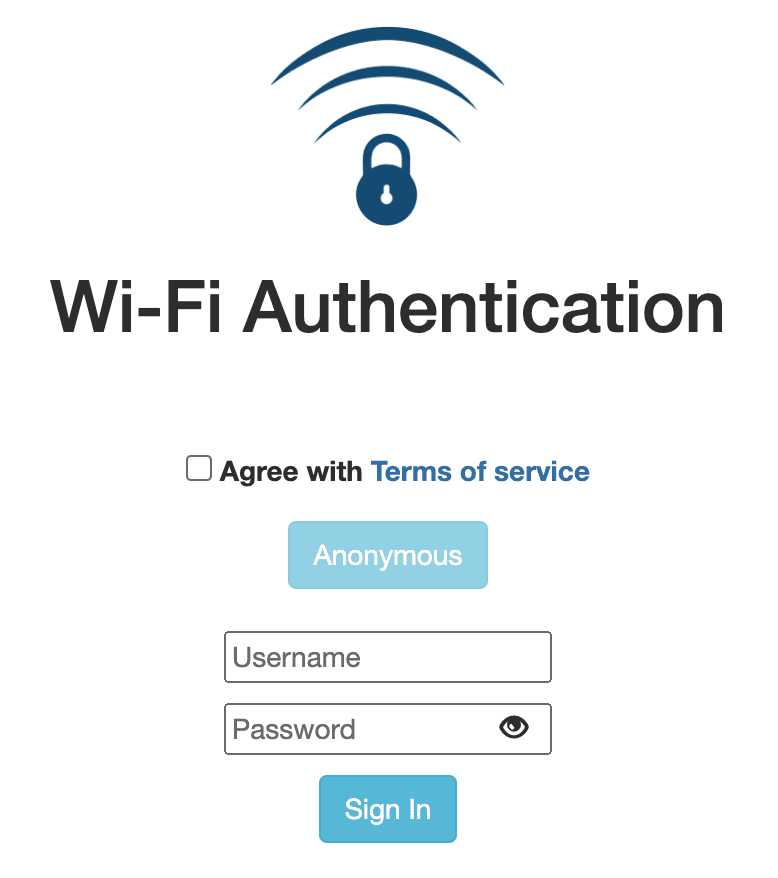
- Click on the Provisioning URL (OSU) link. Invite your users to visit this link before arriving to set up their devices for fast, easy and secure network connection.
- Authenticate using one of the available authentication methods
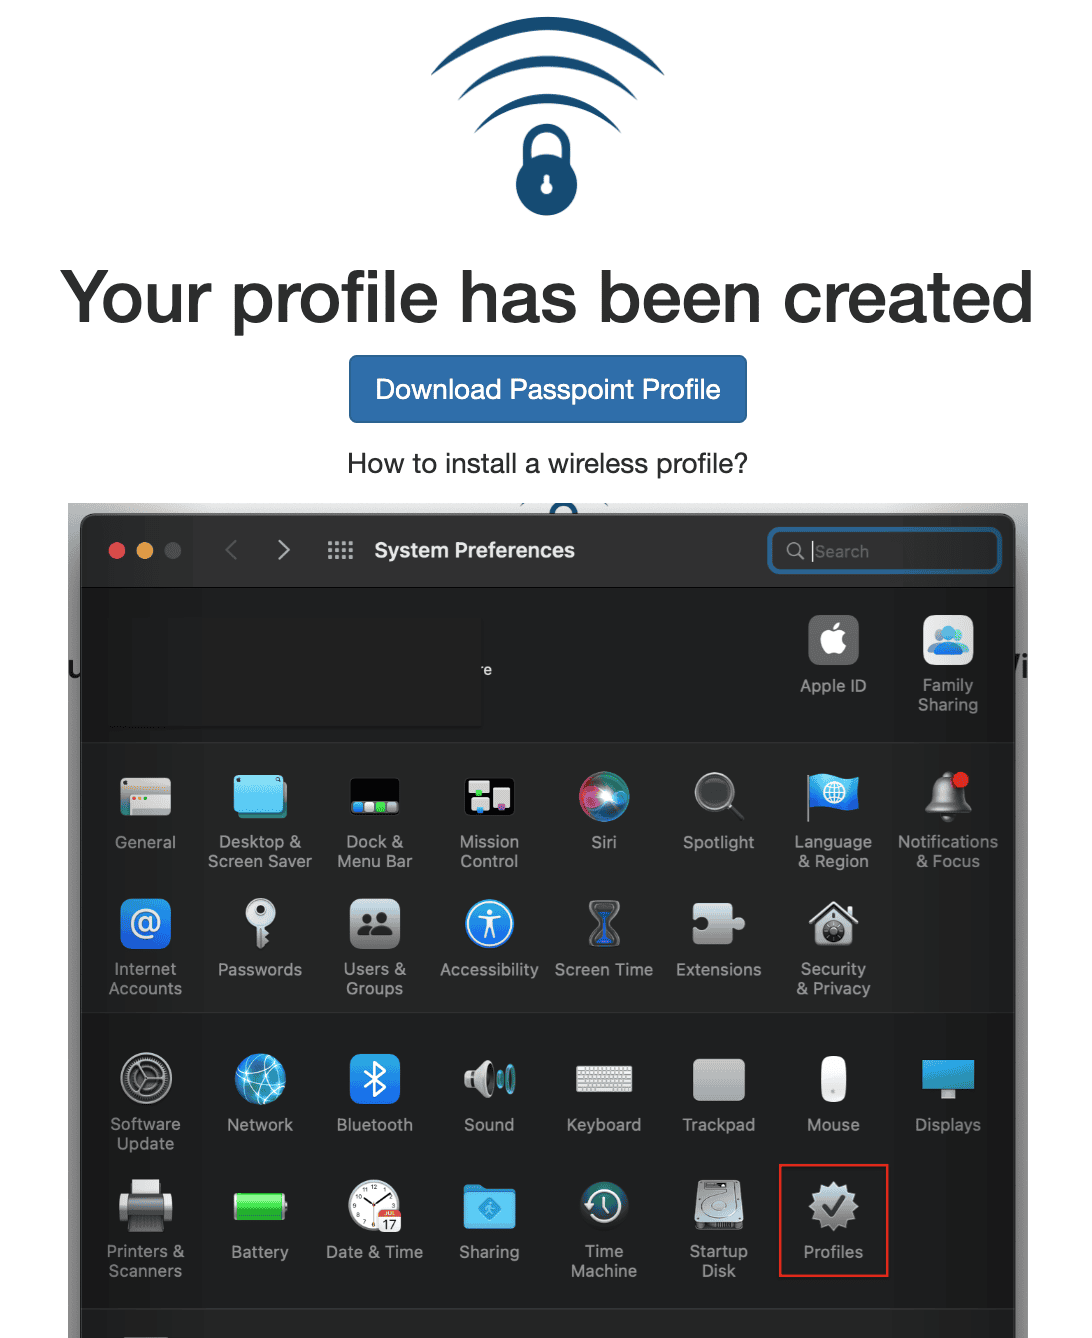
- Install the Passpoint profile by clicking the Download Passpoint Profile button and following the instructions
- If you want to install an OpenRoaming profile that can be used to access compatible networks worldwide, you can do so on this page - https://osu.ironwifi.com
Connect to the Hotspot 2.0 network
- Using the newly installed profile (OperatorName @ IRONWIFI) connect to the network
Captive Portal access control
After successful association to the network, you can add more advanced IronWiFi Captive Portal access control.
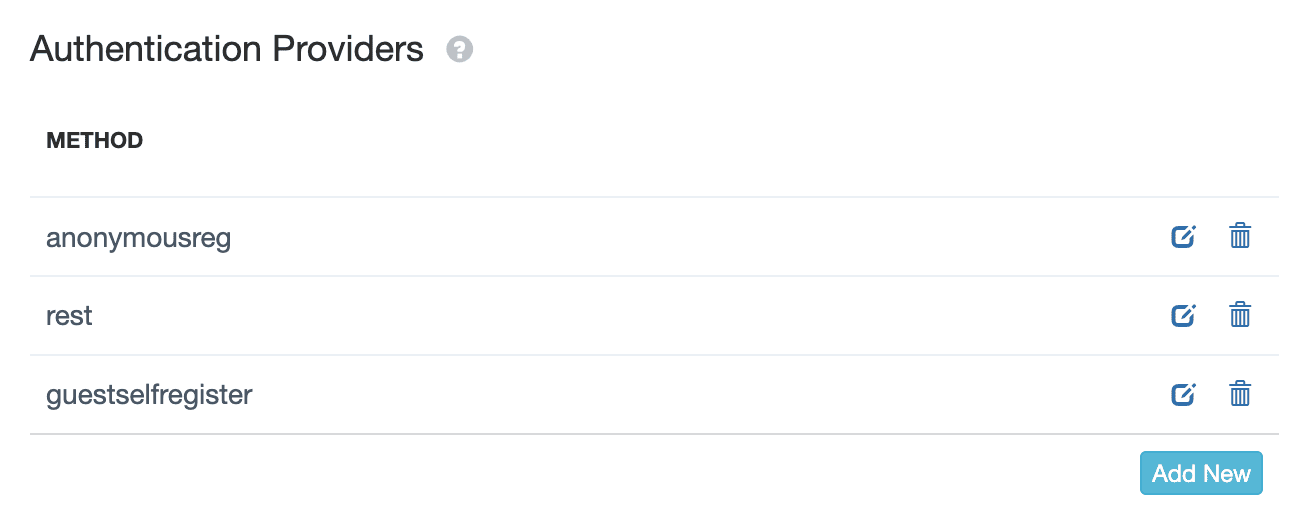
1. In the IronWiFi console, create a Captive Portal of type Meraki (Click-Through)
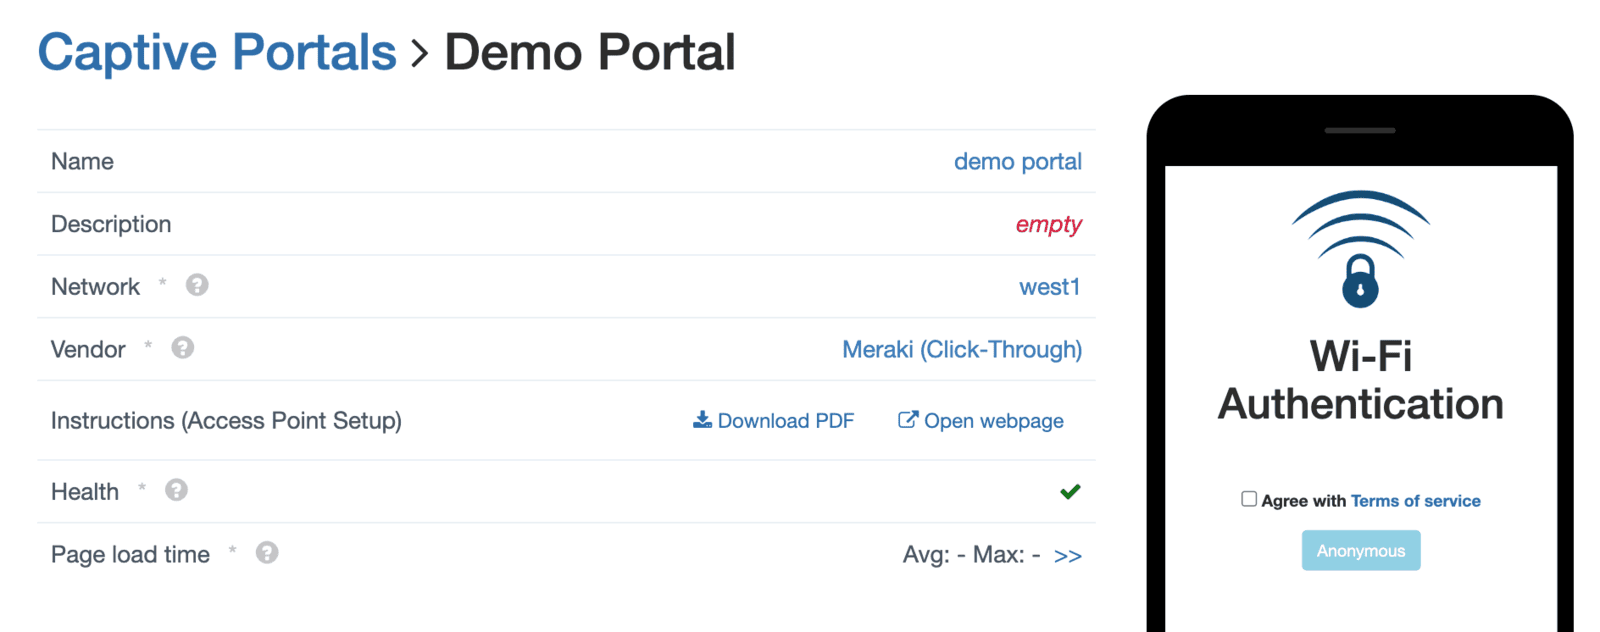
2. You can add the authentication providers you want
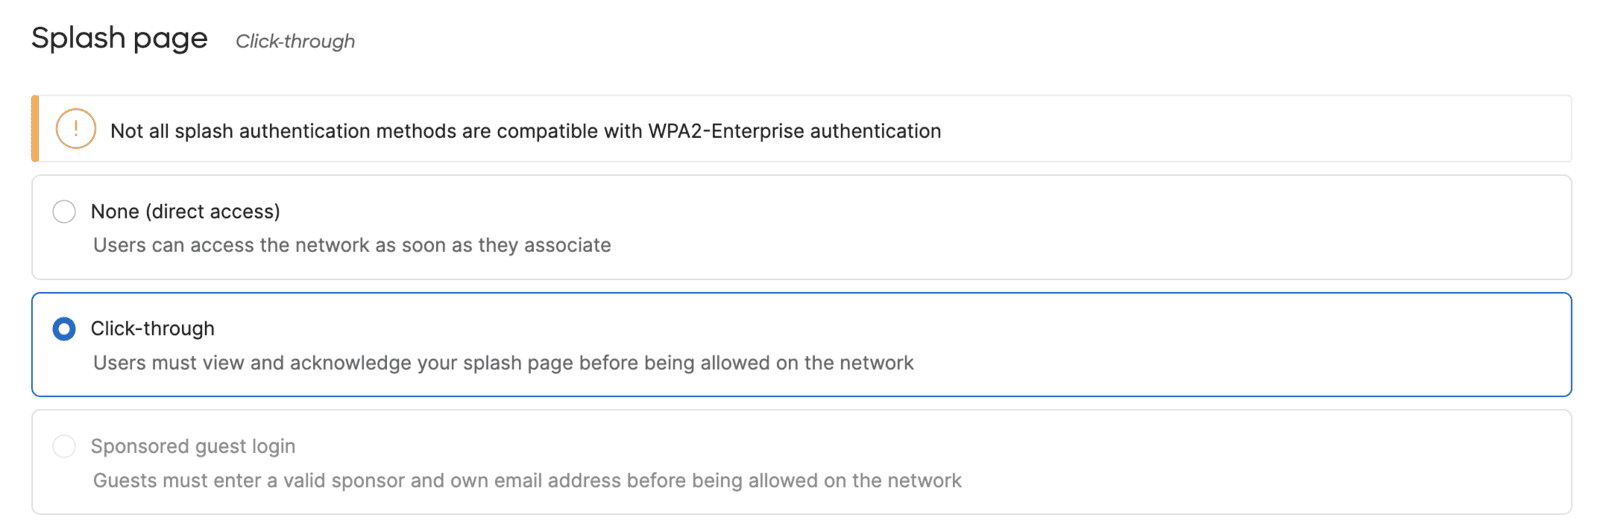
3. In the Meraki Dashboard, enable Splash page if type Click-through
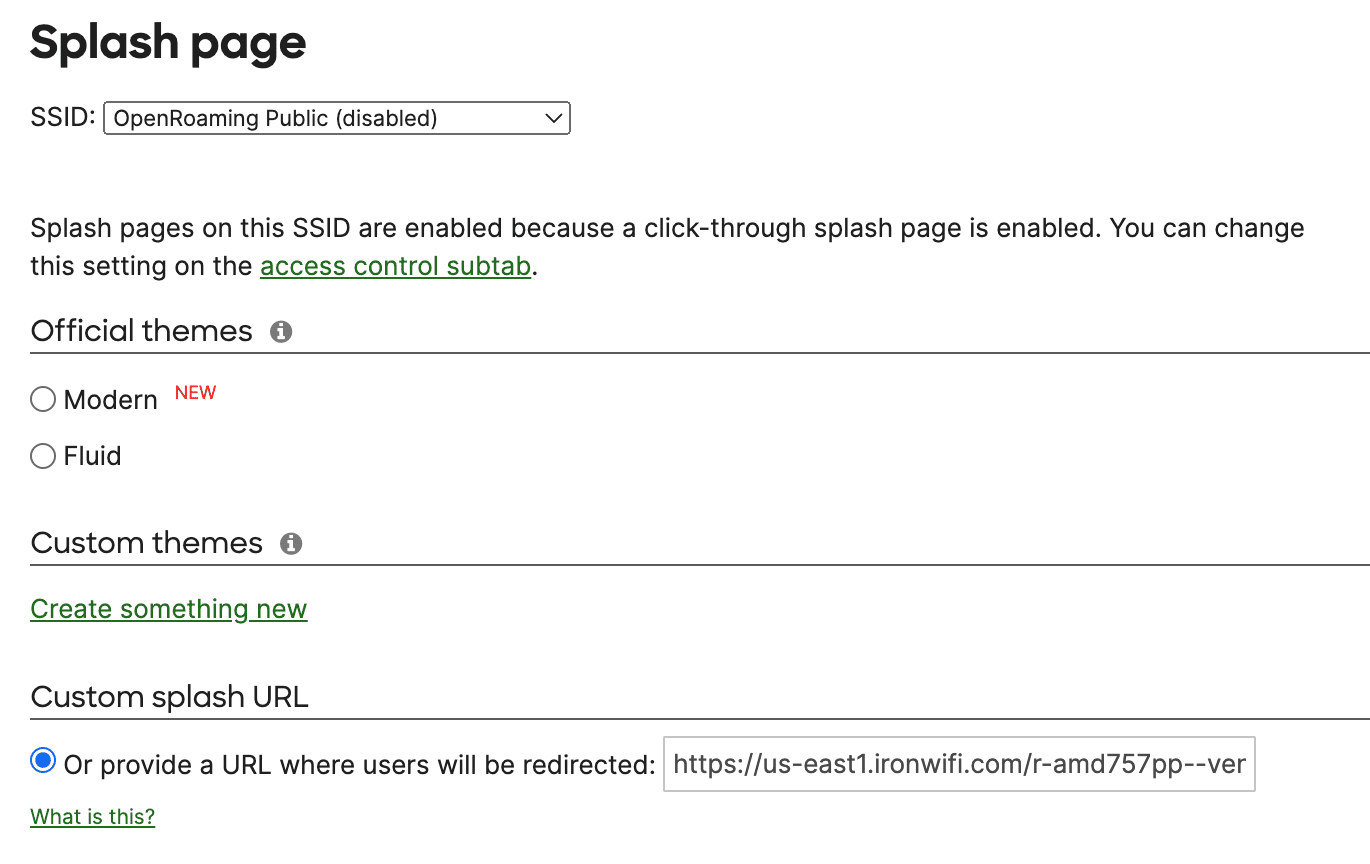
4. Go to Wireless -> Configure Splash page, select the SSID, and add a Custom splash URL
Related Articles
Meraki - Passpoint configuration
Prerequisites Access to the Meraki Dashboard as a user with administrative privileges. Supported Meraki device - this solution works with all devices of the MR series. Information about the assigned RADIUS servers (Server IP address, port numbers, ...Aruba Central OpenRoaming configuration with RadSec
Prerequisites Access to the Aruba Central dashboard as a user with administrative privileges. Access to the IronWiFi Management Console - Sign in or Open Account RadSec enabled on your Network as detailed here (you will need to download the ...Juniper Mist OpenRoaming with RadSec
Prerequisites Access to the Mist Dashboard as a user with administrative privileges. Access to the IronWiFi Management Console - Sign in or Open Account RadSec enabled on your Network as detailed here (you will need to download the certificate ...Ubiquiti Unifi - OpenRoaming Configuration
This guide is for Network version 8.4.x and above ONLY. Ubiquiti has recently reintroduced Passpoint feature into their codebase. Further information about Unifi and Passpoint can be found on the Unifi website: Unifi Passpoint Prerequisites Access to ...Cisco Meraki
This page explains the configuration of Cisco Meraki wireless access points for external Captive Portal and RADIUS server authentication. IronWiFi Console Configuration Log into the IronWiFi console or register for free Create a new network After ...